MouseMux Manual
Last updated August 11, 2026
Welcome
MouseMux turns a single Windows PC into a multi-user machine. Plug in extra mice, keyboards, pens or touchscreens and each one gets its own independent cursor, with its own color, speed and behavior. Several people can then work on the same screen at the same time, side by side or over remote desktop.
A one-minute introduction video
It is a deep and flexible tool, so it helps to know what you are getting into. Getting started is genuinely quick: plug in a second mouse, press Multi-cursor, move it, and you have two cursors. Beyond that, almost anything is possible: per-device acceleration, button remapping, converting one input type into another, simultaneous typing, macros, built-in multi-user apps and remote collaboration. All that capability means there are choices to make, so dialing in the perfect result for your specific use case usually takes a little configuration. The defaults are sensible, and this manual walks you through the rest step by step.
A quick word on modes, because they shape everything else. MouseMux has two main interaction modes. Switched (the default) is rock-solid: everyone can move, drag and type at the same time, taking turns only on a click. Multiplex is the advanced mode that adds fully simultaneous clicking in separate windows. Start in Switched, and switch to Multiplex whenever a setup needs it. There is a full explanation in Interaction Modes below. And Multi keyboard simply adds independent typing on top; it works with both modes, Switched and Multiplex.
What it can and can't do. MouseMux is powerful, but it is not magic: it will not turn every program into a multi-user app at the press of one button, and how well it works depends on the programs you use and how you use them. Moving, dragging and typing together always works in Switched mode. Fully simultaneous clicking is what Multiplex adds, and it works with most programs, though not every single one. Games vary too: many play perfectly as local multiplayer, a few do not cooperate. The fastest way to know is the free edition: try it on your own PC, your own apps and your own use case, and see exactly how it fits before you decide anything.
Installing MouseMux
Requirements: MouseMux runs on every Windows version from Windows XP up to Windows 11, 32 and 64-bit, and on Windows Server. There are no special hardware requirements; if the PC runs Windows, it runs MouseMux. Any mix of USB, Bluetooth or wireless mice, keyboards, pens, touchscreens and touchpads works, and there is nothing to configure on the device side.
Install: press the Download button on the download page, run the setup and follow the steps. The setup asks for administrator rights to install; once installed, MouseMux runs as a normal application and needs no special rights.
Updating: nothing to do. MouseMux keeps itself up to date automatically; when a new version is available it updates itself.
Uninstall: remove MouseMux through Windows Settings > Apps, like any other program. Uninstalling removes everything except your license, so when you reinstall later you are still registered. While MouseMux is installed, your configuration lives in Documents\MouseMux V3; to wipe all settings and installed apps in one go, use Factory Reset (in Advanced Settings under Maintenance). A factory reset cannot be undone.
Start Center
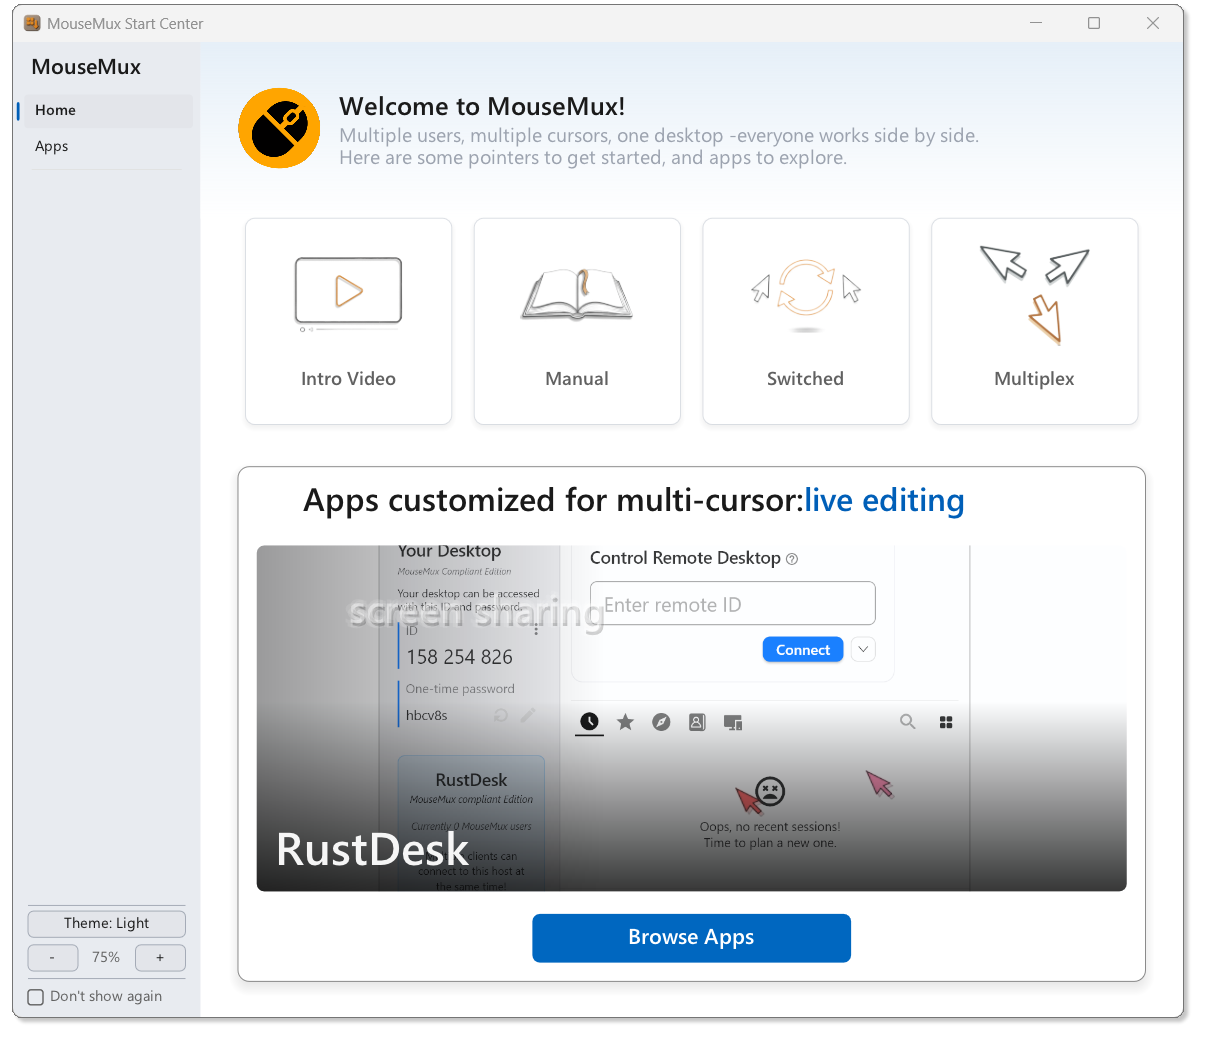
On startup, the Start Center opens alongside the main window. The Home tab has quick links to a video introduction, this manual and explanations of the interaction modes. Use Theme to switch between Light and Dark, and +/- to adjust zoom. Check Don't show again to skip the Start Center on future launches.
The Main Window
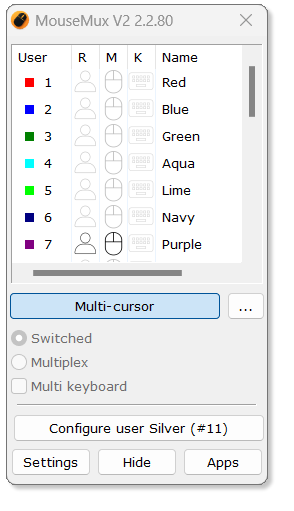
The main window is your control center, with three areas from top to bottom: the user list, the mode controls, and the action buttons.
The User List
Each row in the list is a user, identified by a color and a number. A user owns devices: a pointer and, optionally, a keyboard. Some pointers are virtual, like the touchpad device for laptop touchpads or the capture device for remote desktop.
A user comes to life through registration: move a mouse and it registers to the next free user; its icon in the R column turns black. Press a key while your pointer was the last one moved, and that keyboard gets mapped to that user.
The columns, from left to right:
User
The user's color and number: the fixed identity that everything the user owns and does hangs off.
R (role)
Gray means not registered; black means registered and active. The color then follows the user's role**: orange for the current root user, green when the user's lock is engaged, red when their input is blocked.
P (pointer)
The user's pointer type, shown as an icon: mouse, pen, touch, capture or virtual touchpad. Black while active; lights up orange on movement, clicks or wheel.
K (keyboard)
Black when a keyboard is mapped; lights up orange on keystrokes.
Name
The name of the user. You can change it in the user's settings, on the User tab.
** The role colors belong to Switched mode. Root is the user currently holding a mouse button: while they hold it, others cannot click, though they can still move, drag windows and type. Multiplex works differently: every user owns their own program and clicks never conflict, so there is no root and the R row stays without role colors.
The Buttons
Multi-cursor starts multi-user mode, and the ... button next to it opens the mode guide and the mode selection; both are covered in Interaction Modes. The Configure button always knows who is asking: hover the main window with any cursor and the button shows that user's name; click it and that user's configuration opens. The alternative is just as quick: double-click any user's row (their color or number) and their configuration opens directly. The bottom bar holds Settings, Hide and Apps.
Jump to Interaction Modes ↓
Jump to Interaction Modes ↓
Multiplex (radio): advanced mode. Each user's pointer is routed to a specific program window for full concurrency. Press "..." first to understand the trade-offs.
Multi keyboard (checkbox): adds independent keyboard routing. Each keyboard is directed to the window its user clicked in. Works with both Switched and Multiplex.
Jump to Interaction Modes ↓
You can also double-click a user's color/number in the device list above.
Jump to User Configuration ↓
Jump to Settings ↓
Can be disabled in Advanced Settings under Features.
Jump to Apps ↓
Interaction Modes
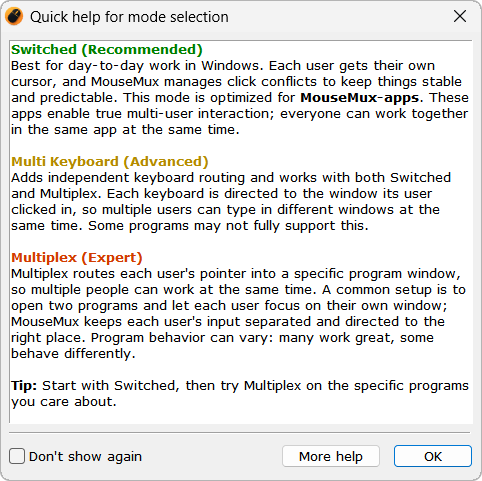
Press the Multi-cursor button in the main window to start: everyone gets their own cursor in Switched mode, which is all most setups ever need. The ... button next to it opens the built-in mode guide shown here and reveals the mode selection underneath: because Switched is right for the large majority, the advanced options stay tucked away until you deliberately open them. The same guide appears the first time you reveal the modes (with a don't-show-again checkbox), and its More help button brings you to this manual.
The main window works from the keyboard too: hold Alt to show the underlined access keys and press Alt + that letter (Alt+S for Settings, Alt+H for Hide, and so on); the main window needs to be focused for these. And for switching modes from anywhere, assign global hotkeys (Ctrl+Alt+1 through Ctrl+Alt+4) in Advanced Settings under Features > Hotkeys: toggle multi-cursor, switch straight to Switched or Multiplex, or toggle multi-keyboard; all without touching the main window. Available in the Advanced and Ultra editions.
Multi-cursor (Switched) Recommended
Each user gets their own cursor. Users can independently drag and resize windows and type in different windows at the same time. Active interaction is switched: when one user holds down a mouse button, others are blocked from clicking (they can still drag windows and type). The user holding the button is the root user.
Best for: most setups: classrooms, shared workstations, collaborative work.
Multi Keyboard Advanced
Adds independent keyboard routing and works with both Switched and Multiplex. Each keyboard is directed to the window its user clicked in, so multiple users can type in different windows at the same time. Some programs may not fully support this.
To pair: move a mouse, then press any key; that keyboard binds to the cursor that moved last. To re-pair, go to the Keyboard tab and click Unmap. If you share one keyboard between users, uncheck Multi keyboard in the main window.
Multiplex Expert
Multiplex routes each user's pointer into a specific program window, so multiple people genuinely work at the same time: clicking, dragging and hovering simultaneously, each in their own program. Once a user clicks on a program they become its owner, and from then on all their mouse and keyboard input is directed there and nowhere else: MouseMux keeps every user's input separated and delivered to the right place.
A common setup is to open two programs and let each user focus on their own window; both work as if they had the machine to themselves. Program behavior can vary: many programs work great, some behave differently, because most Windows software was never written to expect two users at once.
How to use it: start your programs in Switched mode first, then switch to Multiplex. A single click on a program is all it takes: the MouseMux input virtualization engine starts for that program and your input flows to it from then on. Switching to another program is just as easy: click it once and the engine follows you there.
| Actions | Native | Switched | Multiplex |
|---|---|---|---|
| Typing in different windows (Multi Keyboard disabled) | No | No | No |
| Typing in different windows (Multi Keyboard enabled) | No | Yes | Yes |
| Dragging and sizing different windows | No | Yes | Yes |
| Using the mouse wheel in different windows | No | Yes | Yes |
| Clicking in different windows after each other | No | Yes | Yes |
| Clicking in different windows at the same time | No | No | Yes |
| Dragging inside windows at the same time | No | No | Yes |
| Hover effects (highlights, tooltips) on multiple cursors at once | No | No | Yes |
User Configuration
Click the user button in the main window (or double-click a user row) to open the configuration panel. Every setting only affects that specific user; each user can have their own acceleration, theme, overlay, macros and more.
Input
Shows hardware identity, live state, and capabilities for the pointer device assigned to this user. Hover over the numbered spots in the image for details on each element.
The usage table lists everything the device reports it can do, every capability with its value ranges, so you can see at a glance what kind of hardware you are dealing with.
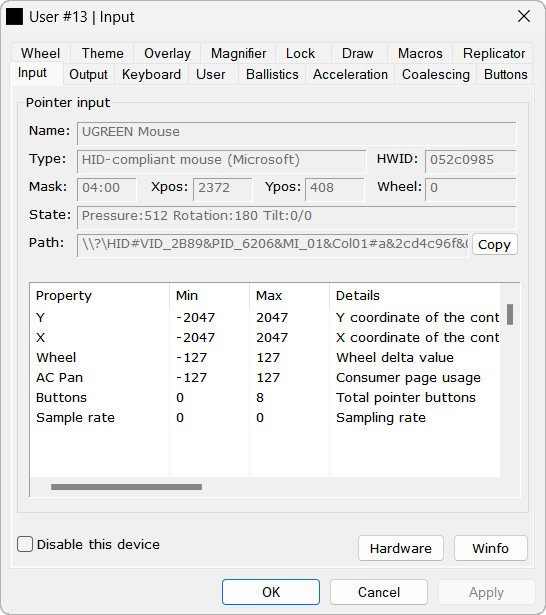
Name: vendor/product IDs (e.g., VID:2b89 PID:0043).
Type: Windows device class (e.g., HID-compliant mouse).
HWID: internal hardware ID MouseMux uses for device tracking across sessions.
Path: full HID device path. Press Copy to copy it to the clipboard.
Output
The Output tab decides what this user's input becomes. Input and output are decoupled in MouseMux: any pointer can be converted into any output type, so a mouse can act as a pen, a touchscreen as a mouse, and a pointer can even drive a virtual gamepad. Around that conversion sit the detailed controls: pen and touch emulation, axis options, overrides, and forwarding input to another user. Hover over the numbered spots in the image for the details of each. The tab is available in Switched and Multiplex modes, from the Advanced edition up.
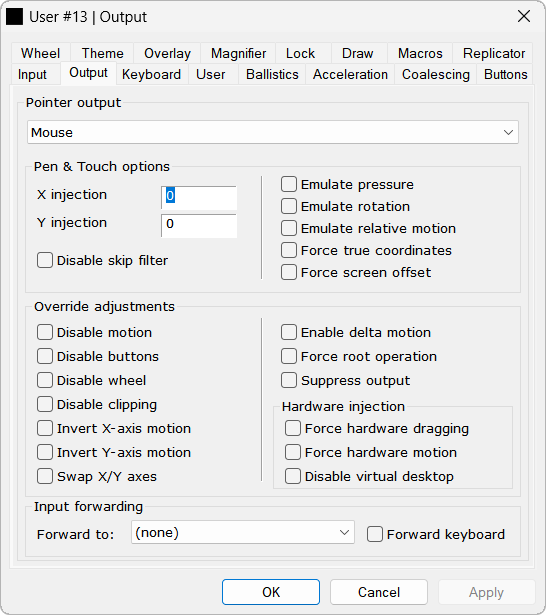
The output type only works in switched mode. In multiplex mode all devices act as virtual mice; the exception is when you enable Force root operation, which forces the selected output type in any mode.
Disable skip filter: when MouseMux injects pen or touch, Windows synthesises legacy mouse events for it and feeds them back as new input. The skip filter recognises these echoes and drops them, so MouseMux does not read its own injection back in a loop. Disable it only for diagnosis, or when a legitimate injected input source (another injector, a virtual mouse) is being swallowed while a pen or touch user is active; expect feedback loops otherwise. Shortcuts: ALT-X / ALT-Y jump to the injection offset fields.
Emulate rotation: the same idea for pen barrel rotation and touch orientation: a synthetic value stepping through 360 degrees, for rotation-sensitive brushes on devices that report none.
Emulate relative motion: for absolute devices (tablets, touchscreens, remote pointers). Instead of teleporting the pointer to the reported position, MouseMux uses the difference from the previous position, so acceleration, ballistics and the per-user speed apply and the device moves like a mouse. The 1:1 mapping to the physical surface is lost.
Force true coordinates: absolute devices normally report 0 to 65535 and MouseMux scales that onto the screen; this uses the raw value as a pixel coordinate directly. For software or virtual pointer sources that already report real pixels and would otherwise be squashed into the top-left corner.
Force screen offset: adds the virtual-desktop origin to incoming absolute coordinates. Only relevant when a monitor sits left of, or above, the primary one; turn it on when a tablet cannot reach those monitors.
Disable buttons: drops clicks before the button state updates, so nothing can latch a drag and button-bound triggers never fire.
Disable wheel: cuts wheel delivery; the wheel value is still computed and visible in diagnostics.
Disable clipping: the pointer position is normally clamped inside the virtual desktop, or inside the locked area when a Lock is set. This skips the clamp: the position can run past the edge, the cursor disappears until you travel the same distance back, and pointer locks no longer confine the user.
Swap X/Y axes: exchanges X and Y after the inversions, so combining swap with an invert rotates the input rather than just mirroring it.
Force root operation: skips the arbitration entirely; this user always injects through the real system path. In Switched mode they no longer take turns, and in Multiplex mode their input moves the single system cursor instead of being routed to their own window. Two users with this flag on will fight over the one system cursor.
Suppress output: everything still runs (the on-screen cursor moves; macros, drawing and SDK clients still receive the events) but the final delivery to Windows is dropped, and forwarding is suppressed too. Compare Disable motion, which freezes the pointer instead. Good for a spectator or annotation pointer, or for driving the SDK without touching the desktop. Shortcut: ALT-S (suppress output).
Force hardware dragging: hardware injection only while a button is held, so you pay the cost just for drags. Some programs need this for drawing or file dragging (Photoshop, MS Paint, Paint.NET).
Force hardware motion: hardware injection for all movement, for the programs that do not follow the cursor at all. Leave both off otherwise: they cost more CPU, and drawing programs will smooth against MouseMux motion points rather than their own, so strokes can look slightly less smooth.
Disable virtual desktop: hardware coordinates are placed in virtual desktop space by default, which is correct on every monitor. This option reverts to the older primary-monitor space. Only enable this if an application specifically needs primary-monitor coordinates. On a multi-monitor setup it breaks drawing and handwriting applications: programs such as Paint.NET read the Windows pointer history to smooth their brush strokes, and in primary space those points are recorded at the wrong coordinates, so strokes shoot off towards a point elsewhere on the desktop. The cursor itself still moves correctly, which makes it look like a bug in the application rather than a setting.
While forwarding is active this user's own cursor is hidden automatically; set the dropdown back to (none) to undo, or unhide it on the Theme tab. Chains (A → B → C) are allowed; loops are blocked. The target's acceleration applies on top of the source's, so for a predictable merge set the target's Ballistics to Disable (raw). Keyboard forwarding is skipped in Multiplex mode unless Multi keyboard is on, and keys are dropped if the target has no keyboard.
Forwarding is the mirror image of the Replicator: the Replicator fans out one user's actions to an extra virtual cursor, while forwarding merges input into an existing one. Shortcuts: ALT-F (forward to), ALT-K (forward keyboard).
Keyboard
Shows which keyboard is paired to this pointer and provides options for how keystrokes are delivered to applications. Hover over the numbered spots in the image for details on each element.
Pairing Basics
Move your mouse, then press any key; the keyboard auto-pairs to whichever cursor moved most recently. To unpair, click Unmap. The keyboard options take effect in Multiplex mode or when Multi keyboard is enabled in the main window.
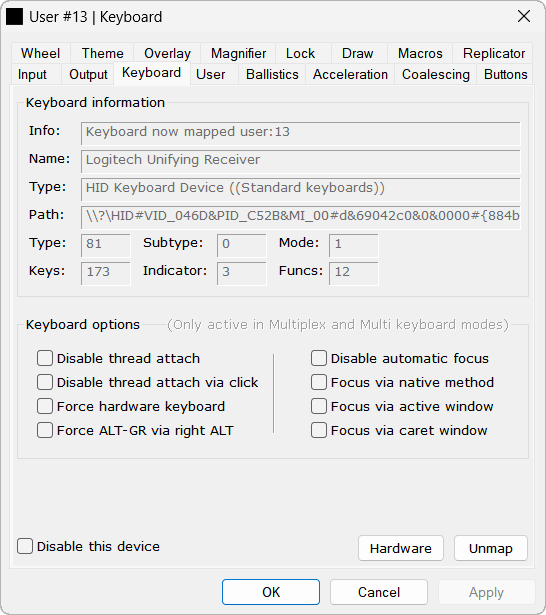
Info: a live status line, not a device property. It shows "Keyboard now mapped user:N" when this user owns a keyboard, otherwise the prompt "Press a key on the keyboard you want to map"; that prompt is literal, pressing a key on an unmapped keyboard is exactly how it gets assigned (see Unmap below).
Name: the full device description reported by the driver.
Type: the parsed device class and vendor.
Path: the Windows device-interface path. This string uniquely identifies the physical device and is what the keyboard-to-user mapping is keyed on.
Type: the keyboard hardware class code.
Subtype: a vendor-defined code with no standardized meaning.
Mode: the scan-code mode.
Keys: total number of keys.
Indicator: number of indicator LEDs (Num, Caps, Scroll: usually 3).
Funcs: number of function keys (usually 12).
These come straight from the driver, and many USB keyboards report the same generic values regardless of their real layout. Treat them as diagnostic identifiers for support, not settings.
Disable thread attach: normally this user's keyboard engine attaches to the input queue of the window the user clicked, so it can push this user's private Shift/Ctrl/Alt/Caps state into the app: the app then sees that user's modifiers, not the global ones. Tick this if a particular app hangs or destabilizes when attached. Keys still arrive, but the app reads the global modifier state, so per-user Shift/Ctrl combinations and Caps Lock can misbehave.
Disable thread attach via click: same attach, different trigger. Normally the attach starts when the user clicks a window, and the click briefly waits for it to complete. Tick this if clicking into a slow app causes a visible stall for that user; the attach then happens on the first keystroke instead, and per-user key state is kept.
Force ALT-GR via right ALT: Windows wraps AltGr in a hidden left-Ctrl that never reaches MouseMux, so AltGr has to be detected from the keyboard layout, and that detection can fail (for example after switching layouts at runtime). Tick this to always treat right ALT as AltGr; MouseMux then synthesizes the missing Ctrl sequence itself. Use it when AltGr characters (@, €, [, ]) fail to type on non-US layouts.
Focus via native method: a more direct focus lookup, asking Windows for the focused window straight away instead of the full search.
Focus via active window: target the clicked application's active top-level window instead of probing for the focused child control. Useful when an app moves focus to a dialog or popup that the automatic search resolves incorrectly.
Focus via caret window: target the window that owns the blinking text caret. Works well in classic editors and forms; many modern apps never create a system caret, in which case the normal search takes over again. If both are ticked, active window wins.
User
View usage statistics and change the display name for this user. Hover over the numbered spots in the image for details on each element.
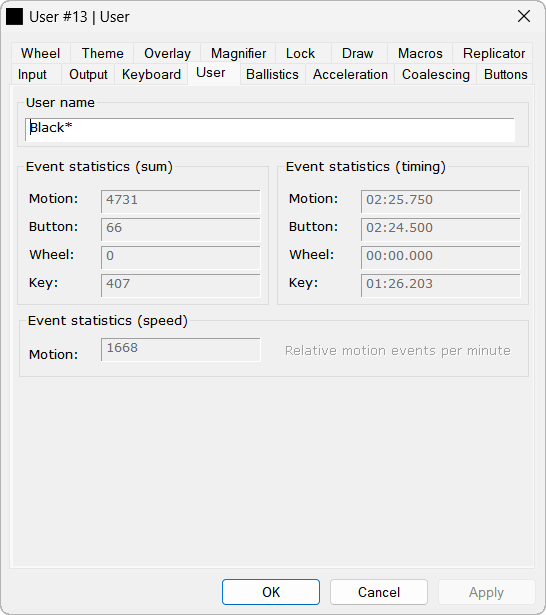
Event statistics (timing): timestamp of the last event of each type. Useful for checking whether a device is actively sending input.
Ballistics
Configure the acceleration curve that translates raw mouse movement to cursor movement. Each user can have their own acceleration feel. Hover over the numbered spots in the image for details on each element.
Which Mode?
Native: uses the acceleration curve MouseMux measured from your system at startup. Disable: raw 1:1 input, no acceleration. Emulate: pick a specific Windows version curve. Lets different users each have their own acceleration feel.
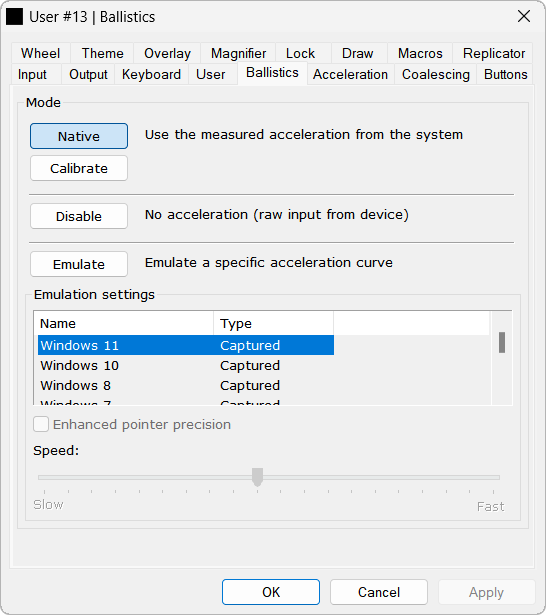
Native: uses the acceleration curve MouseMux measured from your system at startup. This matches your current Windows pointer settings. Press Calibrate to re-measure the system curve.
Disable: raw hardware input with no acceleration. Your mouse movement maps directly to pixels.
Emulate: select a Windows version and emulate its ballistics. You can also set the speed and choose whether to emulate Enhanced pointer precision. Press Apply to activate.
Shortcuts: ALT-N (Native), ALT-D (Disable), ALT-E (Emulate), ALT-C (Calibrate).
The Speed slider adjusts overall pointer speed within the selected acceleration curve. Shortcut: ALT-H (enhanced pointer precision).
Acceleration
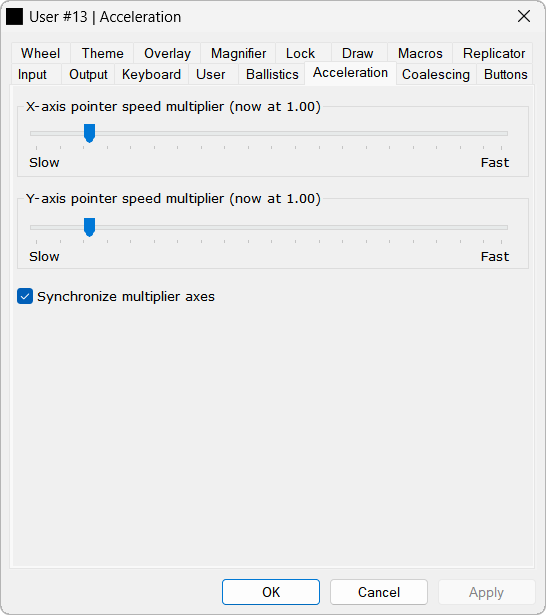
Fine-tune pointer speed with independent X and Y axis multipliers, applied on top of the acceleration curve from the Ballistics tab. Hover over the numbered spots in the image for details on each element.
Coalescing
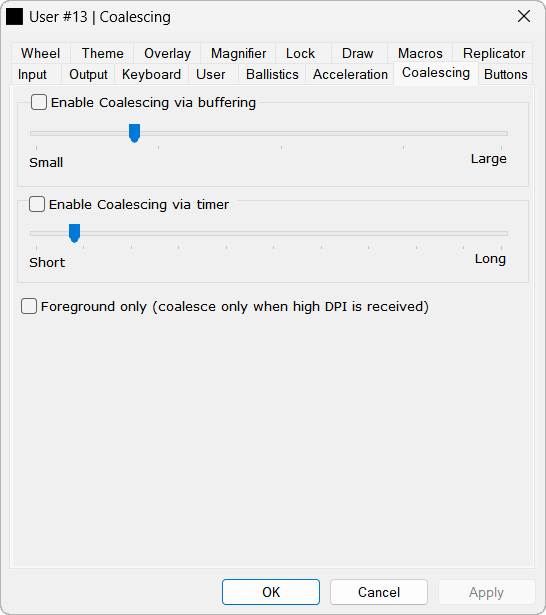
Reduce event frequency from high-polling mice by merging rapid events into fewer combined events. Hover over the numbered spots in the image for details on each element.
Buttons
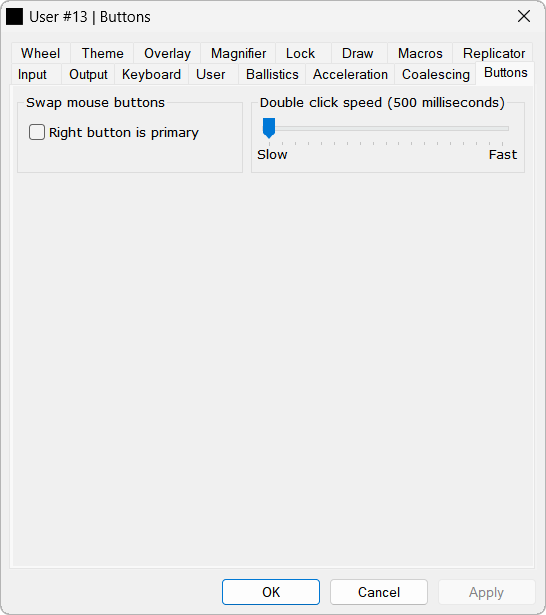
Swap mouse buttons for left-handed use and adjust double-click timing. Settings are per-user. Hover over the numbered spots in the image for details on each element.
Wheel
Control scroll speed, direction, and horizontal wheel emulation. Hover over the numbered spots in the image for details on each element.
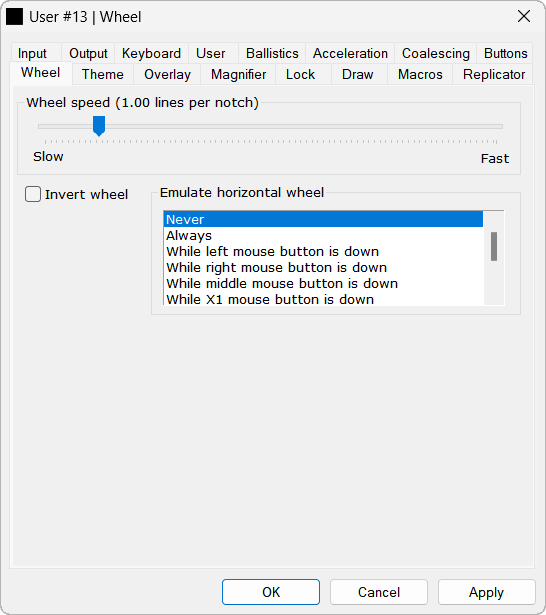
Emulate horizontal wheel: converts vertical scrolling to horizontal. Options: Never, Always, While left/right/middle/X1 mouse button is down. Press Apply to activate. Shortcut: ALT-I (invert wheel).
Theme
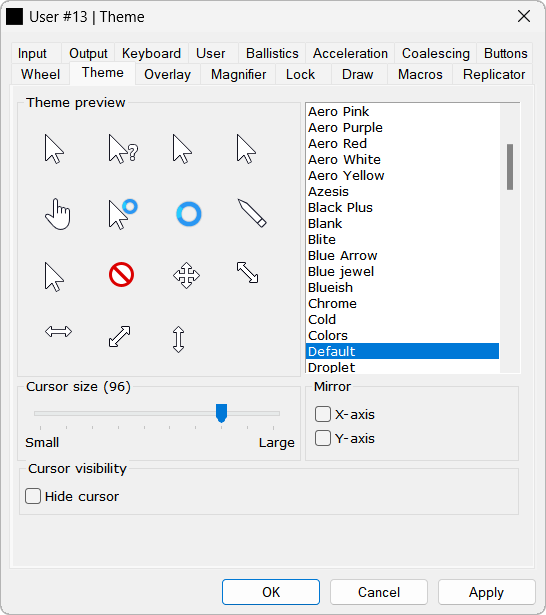
Change the cursor appearance. Assign different colors and sizes to each user so everyone can tell their cursor apart. The Hide cursor checkbox makes this user's cursor invisible while input keeps working; it is also the place to unhide a cursor that was hidden automatically by forwarding. Hover over the numbered spots in the image for details on each element.
Overlay
Add visual identifiers to cursors. Hover over the numbered spots in the image for details on each element.
Three Layers
Tag: a colored shape (simplest identification). Text: a name label (shows who is who). Icon: an application icon. All three can be enabled at the same time.
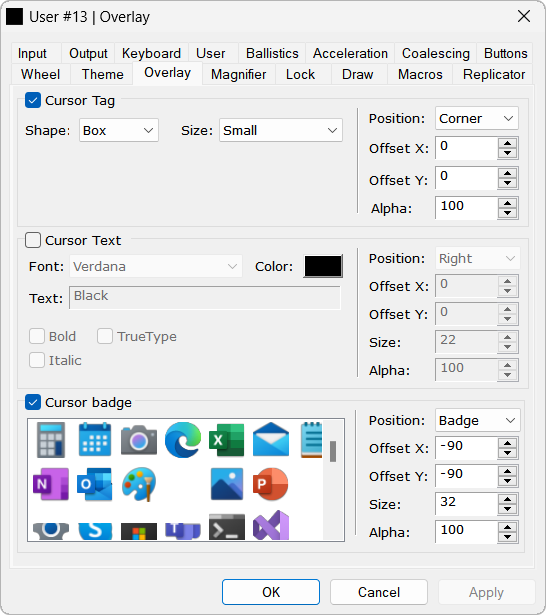
Shape: choose the shape (Box, Circle, etc.).
Size: Small, Medium, Large.
Position: where the tag appears relative to the cursor (Corner, etc.).
Offset X/Y: fine-tune placement in pixels.
Alpha: transparency (0 = invisible, 100 = opaque).
Shortcut: ALT-C (enable).
Font: choose the typeface.
Color: text color.
Text: the label to display (defaults to the user's name).
Bold, Italic, TrueType: font style options.
Position: where the label appears (Right, Left, Top, Bottom, etc.).
Offset X/Y: fine-tune placement in pixels.
Size: font size.
Alpha: transparency.
Shortcut: ALT-U (enable).
Position: where the badge appears (Badge, Corner, etc.).
Offset X/Y: fine-tune placement in pixels.
Size: icon size.
Alpha: transparency.
Shortcut: ALT-B (enable).
Magnifier
Add a magnified view that follows the cursor. Useful for detail work or accessibility. Each user can have their own independent magnifier. Hover over the numbered spots in the image for details on each element.
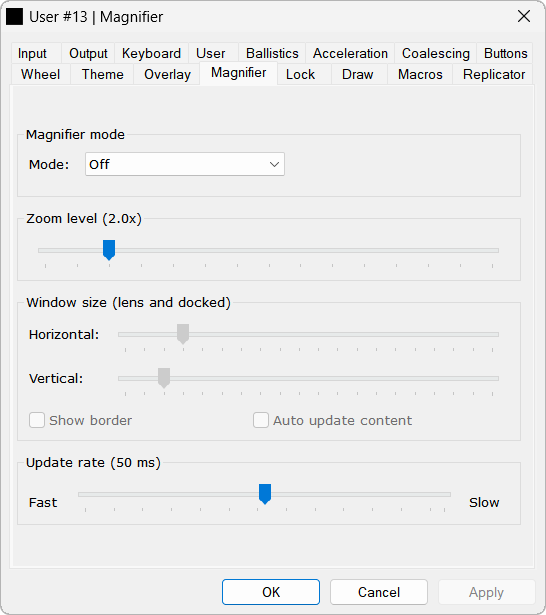
Off: disabled.
Lens: a floating magnification window follows the cursor.
Docked: magnified view is pinned to a screen edge.
Fullscreen: the entire display is magnified around the cursor position.
Lock
Restrict this cursor to a specific monitor or window. Hover over the numbered spots in the image for details on each element.
Two Lock Types
Monitor lock: cursor stays on the selected display. Note that your mouse may move to a different monitor than where the dialog is, so you may need another mouse to undo the lock. Window lock: cursor is confined to a specific application window.
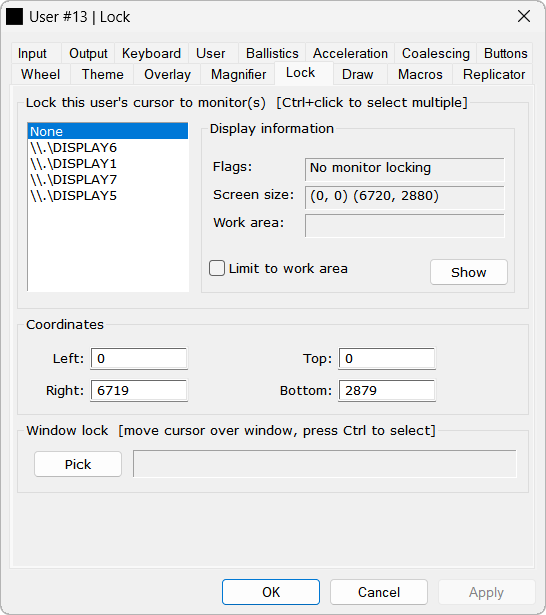
Limit to work area: restricts the cursor to the work area instead of the full screen.
Show: briefly highlights the physical display so you can identify which monitor is which.
Shortcuts: ALT-L (limit to work area), ALT-S (show).
Draw
Draw or annotate directly on the screen. Each user has their own canvas, so everyone can draw at the same time in their own color without getting in each other's way. Clearing only removes your drawing, unless you enable Clear for all users. This makes it great for classrooms, brainstorming and live markup where several people annotate together. Hover over the numbered spots in the image for details on each element.
Shortcuts
ALT-D: toggle draw mode. ALT-E: eraser. ALT-C: clear. ALT-O: color picker.
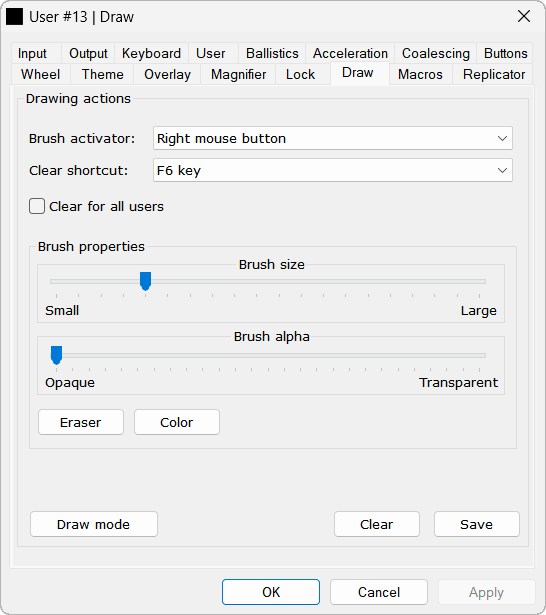
Clear shortcut: pick a key to clear the canvas (e.g., F6).
Clear for all users: when checked, pressing Clear erases drawings from all users, not just your own.
Shortcuts: ALT-B (brush activator), ALT-S (clear shortcut).
Brush alpha: drag from Opaque to Transparent to control how see-through the strokes are.
Eraser: switch to eraser mode to remove parts of your drawing.
Color: open the color picker to change the brush color.
Clear: clears the drawing.
Save: saves a screenshot to the MouseMux data folder in Documents.
Shortcuts: ALT-D (draw mode), ALT-E (eraser), ALT-C (clear), ALT-O (color), ALT-V (save).
Macros
Record and replay mouse and keyboard actions, generate movement patterns, or jiggle the mouse to prevent screen sleep. The neat multi-user trick: record a sequence once with one user, then save it and load it onto other users or devices to play it back: so a single recording can drive several cursors at the same time. Handy for demos, repetitive testing, automation and setups where many pointers need to do the same thing. Hover over the numbered spots in the image for details on each element.
Shortcuts
ALT-R: start recording. ALT-P: play. ESC: stop (when "Stop on ESC" is enabled).
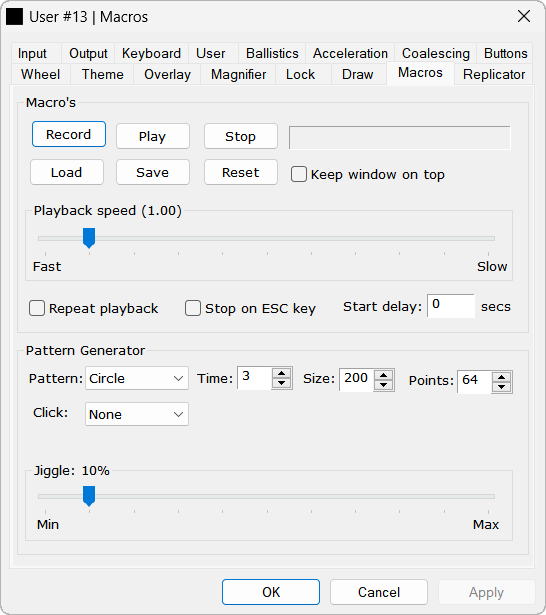
Interaction with MouseMux windows is filtered out. Recording works in switched and multiplex mode. Keep window on top keeps this dialog visible. Shortcuts: ALT-R (record), ALT-P (play), ALT-S (stop), ALT-L (load), ALT-V (save), ALT-T (reset).
Pattern: shape to trace (Circle, Square, etc.).
Time: seconds per cycle.
Size: pattern radius in pixels.
Points: number of steps per cycle (higher = smoother).
Click: optionally inject a click at each point (None, Left, Right, etc.).
Replicator
Clone this user's actions to a virtual cursor. The clone mirrors movement, clicks, scrolling and/or keystrokes with adjustable offset and delay. A replicated user can replicate itself again, creating chains. Hover over the numbered spots in the image for details on each element.
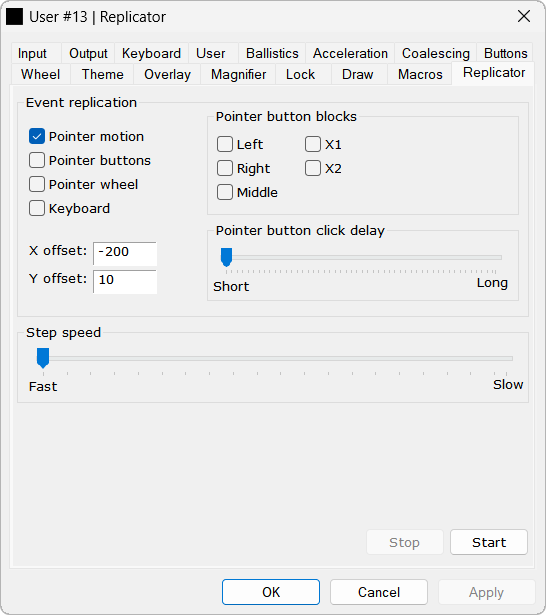
Pointer motion: duplicates movement (enabled by default).
Pointer buttons: duplicates clicks.
Pointer wheel: duplicates scrolling.
Keyboard: duplicates keystrokes.
X offset / Y offset: positions the replicated cursor relative to the original in pixels. Use negative values to place it to the left or above. This is how you space out the clones.
A replicated user can replicate itself again, creating chains of cloned cursors.
Shortcuts: ALT-M (motion), ALT-B (buttons), ALT-W (wheel), ALT-K (keyboard).
Pointer button click delay: adds a delay between the original click and the replicated click. Drag the slider from Short (near-instant) to Long (noticeable gap). Useful when the target application needs time between successive clicks.
Shortcuts: ALT-L / ALT-R / ALT-D / ALT-1 / ALT-2 toggle the blocks.
Start: creates a new virtual user and begins replication. The clone appears in the main window's user list with its own color.
Stop: ends replication and removes the virtual user.
Shortcuts: ALT-S (start), ALT-T (stop).
Settings
The Settings dialog handles license activation, user configuration persistence, and startup behavior. Hover over the numbered spots in the image to learn about each section.
License & Editions
MouseMux comes in four editions: Free, Core, Advanced and Ultra. Which feature belongs to which edition is listed in the feature comparison; sections in this manual name their edition where it matters.
The Free edition is the full product for trying MouseMux out: it supports two users (two mice, two keyboards) and runs in sessions of 45 minutes. When a session ends, simply restart MouseMux and continue; there is no limit on the number of sessions.
Registering: after a purchase your license key arrives by email. Press Register, enter the key, and the License box shows your edition. The license stays on the PC even when you uninstall MouseMux. Manage opens your online license page with your purchase and payment details.
Saving Your Setup
Load and Save user settings are deliberately separate: you can load a known-good configuration every time without saving changes, creating a "reset on restart" workflow.
Where everything lives: all configuration is stored in Documents\MouseMux V3 as readable JSON files: per-user settings (device mappings, colors, macros, preferences) plus program data. Your license is not stored there; it stays on the machine even when you uninstall.
Backup: copy the Documents\MouseMux V3 folder somewhere safe; that is the complete backup. To restore, close MouseMux, copy the folder back and start again. A Factory Reset wipes this folder along with the installed apps, so make the copy first if you ever want the setup back.
Advanced
The Advanced button at the bottom opens the full Advanced Settings tree with every configuration option MouseMux offers.
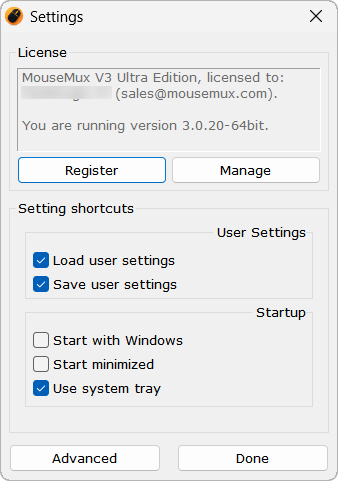
Manage: opens your online license page with your purchase and payment details.
Jump to License & Editions ↓
Save user settings: saves the configuration for each user before the program exits.
By separating load and save, you can load a specific configuration each time without overwriting it.
Start minimized: starts with the main window hidden.
Use system tray: adds a tray icon. When hiding, MouseMux goes to the system tray instead of the taskbar.
The Advanced button opens the full Advanced Settings tree.
Settings Reference
- LicenseShows your current edition (Free, Core, Advanced, Ultra). Click Register to enter a key.
- Load user settingsRestore per-user device mappings, colors, and preferences on startup. bool
- Save user settingsWrite device mappings, colors, macros, and preferences to JSON on shutdown. bool
- AutostartAuto-launch MouseMux on Windows startup via the loader service. bool
- Start minimizedLaunch to the system tray without showing the main window. bool
- System trayShow the MouseMux icon in the system tray for quick access. bool
- AdvancedOpens the full Advanced Settings tree (see below).
Advanced Settings
The Advanced Settings tree gives access to every configuration option in MouseMux. Hover over the numbered spots in the image to explore each category.
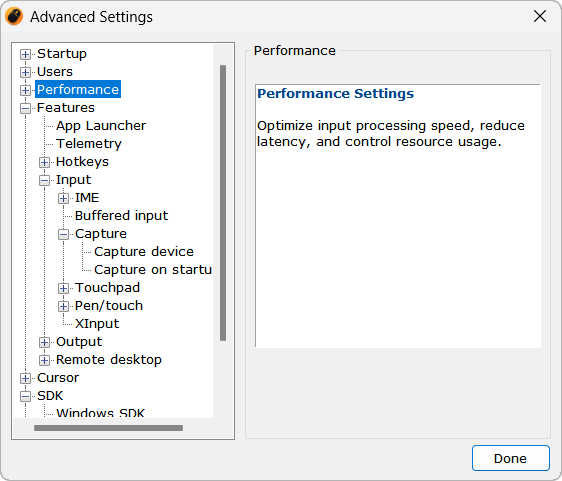
Every entry is explained in the reference below.
Jump to the full reference ↓
The tree also contains an Expert group with advanced troubleshooting tools, including the Diagnostic Guard. These are meant to be used together with MouseMux support; leave them off unless support asks you to enable them.
Service Configuration
MouseMux's low-level input hooks run in a small background component. Service Configuration (under Maintenance) tunes how they behave; the defaults are right for almost everyone.
- Block (external) injection: ignores pointer input that other programs inject.
- Block touch events: ignores touch input at the system level.
- High priority threading: runs input processing at a higher thread priority.
- Pass modifier keys: passes Shift and Ctrl through to Windows even while MouseMux is routing keyboards itself.
Advanced Settings Reference
- ▶Startup
- AutostartAuto-launch on Windows startup via registry. bool
- Start minimizedLaunch to tray without main window. bool
- System trayShow icon in system tray for quick access. bool
- Startup logoSkip the animated startup logo. bool
- ▶Users
- Load usersRestore device mappings, colors, and preferences on startup. bool
- Save usersSave user configuration to JSON on shutdown. bool
- Base mappingIdentify devices by vendor/product ID only, regardless of USB port. bool
- Restore keyboardsAuto-map keyboards to the same user as last session. bool
- ▶Performance
- ▶Core speed
- Iteration speedProcessing speed. Left = lower CPU, Right = faster.
- Current FPSReal-time frame rate (read-only).
- ▶Optimization
- Prioritize threadingBoost input threads to High Priority. bool
- Prioritize multiplexingBoost multiplex threads for lower latency. bool
- ▶Features
- App LauncherDisable the App Launcher, replace Apps button with Exit. bool
- TelemetryDisable anonymous usage analytics. bool
- ▶Hotkeys
- Toggle multi-cursorGlobal hotkey to turn multi-cursor on or off (Off, Ctrl+Alt+1-4). combo
- Switch to SwitchedGlobal hotkey to switch directly to Switched mode. combo
- Switch to MultiplexGlobal hotkey to switch directly to Multiplex mode. combo
- Toggle multi-keyboardGlobal hotkey to toggle independent keyboard routing. combo
- ▶Input
- ▶IME
- Enable IMETurn on the built-in multi-user input method editor. bool
- Toggle hotkeyPer-user hotkey to switch between IME and normal typing. combo
- Input methodPinyin, Cangjie, Quick, Hangul, Kana, Telex, Indic and direct script layouts. combo
- Romanization (Indic)Romanization scheme used for Indic scripts. combo
- Window sizeSize of the candidate window. combo
- ThemeLight or dark candidate window. combo
- OpacityCandidate window transparency.
- Candidate layoutHorizontal or vertical candidate list. combo
- FontCandidate window font. combo
- Accent from user colorTint the candidate window with the user's color. bool
- Show candidate numbersShow the number keys next to candidates. bool
- Buffered inputUse message-based input. May reduce latency 4-8ms. bool
- ▶Capture
- Capture deviceDisable the capture device for remote desktop and auto-clickers. bool
- Capture on startupAuto-activate capture device on startup. bool
- ▶Touchpad
- Touchpad deviceDisable the touchpad device for high-precision touchpads that inject their input. bool
- Touchpad on startupAuto-activate the touchpad device on startup. bool
- ▶Pen/touch
- Pen/touch inputIgnore pen and touch devices. Reduces overhead ~5%. bool
- Legacy pen/touchAccept legacy virtual pen/touch pointers. bool
- Synthetic pen/touchAccept synthetic pen/touch from Win10+ injection. bool
- XInputEnable Xbox controller gamepad support as pointer input. bool
- ▶Output
- ViGEmCreate virtual Xbox 360 or DualShock 4 gamepads per user. bool
- Dynamic DPIDisable per-monitor DPI scaling. bool
- UWP automationDisable UIAutomation for UWP apps. bool
- ▶Remote desktop
- ▶RustDesk
- RustDesk integrationDisable the built-in RustDesk integration entirely. bool
- TeamViewerTag each remote user's input with a unique ID. bool
- AnyDeskTag each remote user's input with a unique ID. bool
- ▶Cursor
- Windows cursorUse native Windows cursor instead of virtual cursors. bool
- Delta motionDetect external mouse motion and merge with internal coordinates. bool
- Hide inactive cursorsAuto-hide cursors after 10 seconds of inactivity. bool
- Cursors on lock+UACKeep virtual cursors active on the lock screen, UAC and other secure desktops. bool
- Cursor driverRendering method: Layered Window, DComp GPU, etc. combo
- ▶Cursor type change
- Switched typeMatch system cursor shape (hand, I-beam, arrows) in switched mode. bool
- Switched imageMatch custom cursor images from apps in switched mode. bool
- Multiplex typeMatch cursor shape from the target app in multiplex mode. bool
- ▶SDK
- Windows SDKEnable Windows message SDK for third-party integration. bool
- Web SDKEnable WebSocket SDK for web-based integration. bool
- Web SDK PortWebSocket server port (default: 41001).
- ▶Maintenance
- Service ConfigurationOpen the background service configuration window. action
- ▶Core
- Windows ServiceRun the background service that powers input virtualization. bool
- Core UpdaterCheck for and install available core updates. action
- Core UploaderUpload diagnostic logs to MouseMux support. action
- ▶Apps
- Web HostConfigure the Web Host, the helper that opens web apps and URLs. action
- App File AssociationsRegister .mousemux-app file extension. action
- ▶Advanced
- Browser startupHow the Web Host launches your web browser. combo
- Data folder locationMove data if Documents is synced by OneDrive. combo
- License registry backupStore license backup in Windows registry as fallback. bool
- ▶Expert
- Load hotfix moduleLoad a signed hotfix DLL from the protected program folder. action
- Diagnostic GuardSupervised troubleshooting: enables Windows page-heap checking so a crash dump pinpoints the culprit. Use together with MouseMux support. action
- ▶Reset
- Factory ResetDelete configuration, reset all to defaults. Cannot be undone. action
- Factory Reset AppsDelete all app files and refresh launcher. Cannot be undone. action
Apps
MouseMux Apps are full, standalone applications (a paint program, a web browser, a streaming console) that we bundle and customize to work with MouseMux. They are real apps in their own right, not something running "inside" MouseMux. What MouseMux adds is orchestration: it is the conductor of user input, directing each person's mouse and keyboard to the right app and the right window at the right moment. That is what makes rich, flexible scenarios possible: a whole stack of real apps running at once, each shared in whatever way fits the task.
Apps fall into a few patterns: from full collaboration, to complete isolation, to configuration that shapes how MouseMux itself behaves.
Multi-user apps
The richest scenario is collaboration: several people act inside the same app at the same time, with no taking turns; everyone clicks, drags and types together. No passing the mouse around, no "your turn / my turn", no one person driving while the rest just watch. The friction of crowding around a single screen simply disappears, and the work moves at the speed of the whole group. It feels like everyone finally has their own hands on the same thing.
Some examples are:
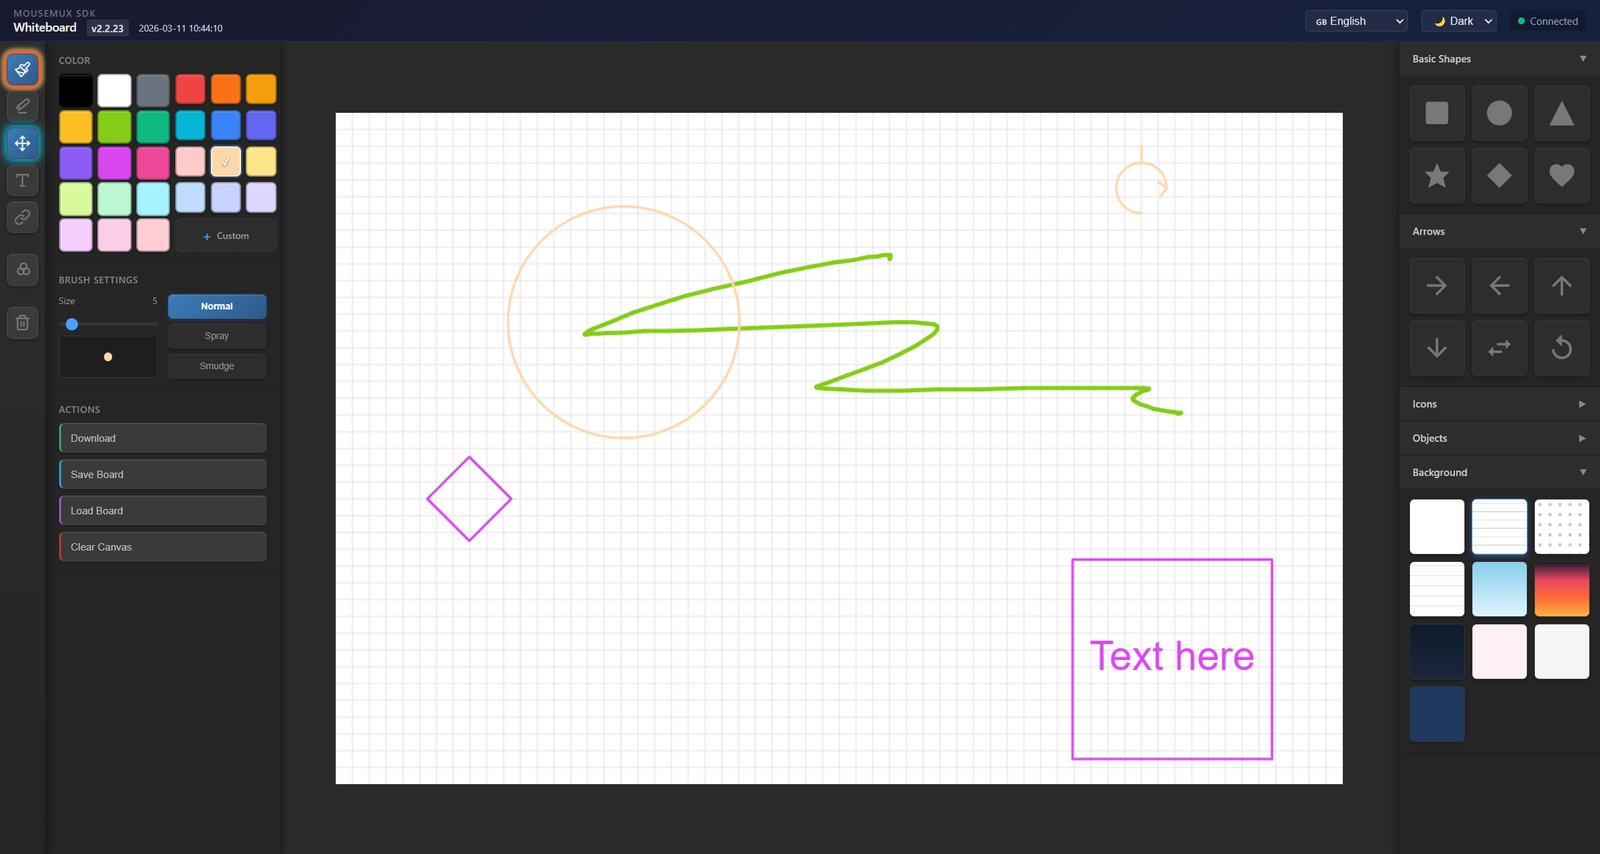
Whiteboard
A shared whiteboard where everyone draws, adds shapes, text and sticky notes together in real time, each with their own color-coded cursor. Great for teaching, planning sessions and remote workshops where the whole room needs to contribute at once instead of one person scribing for everybody.
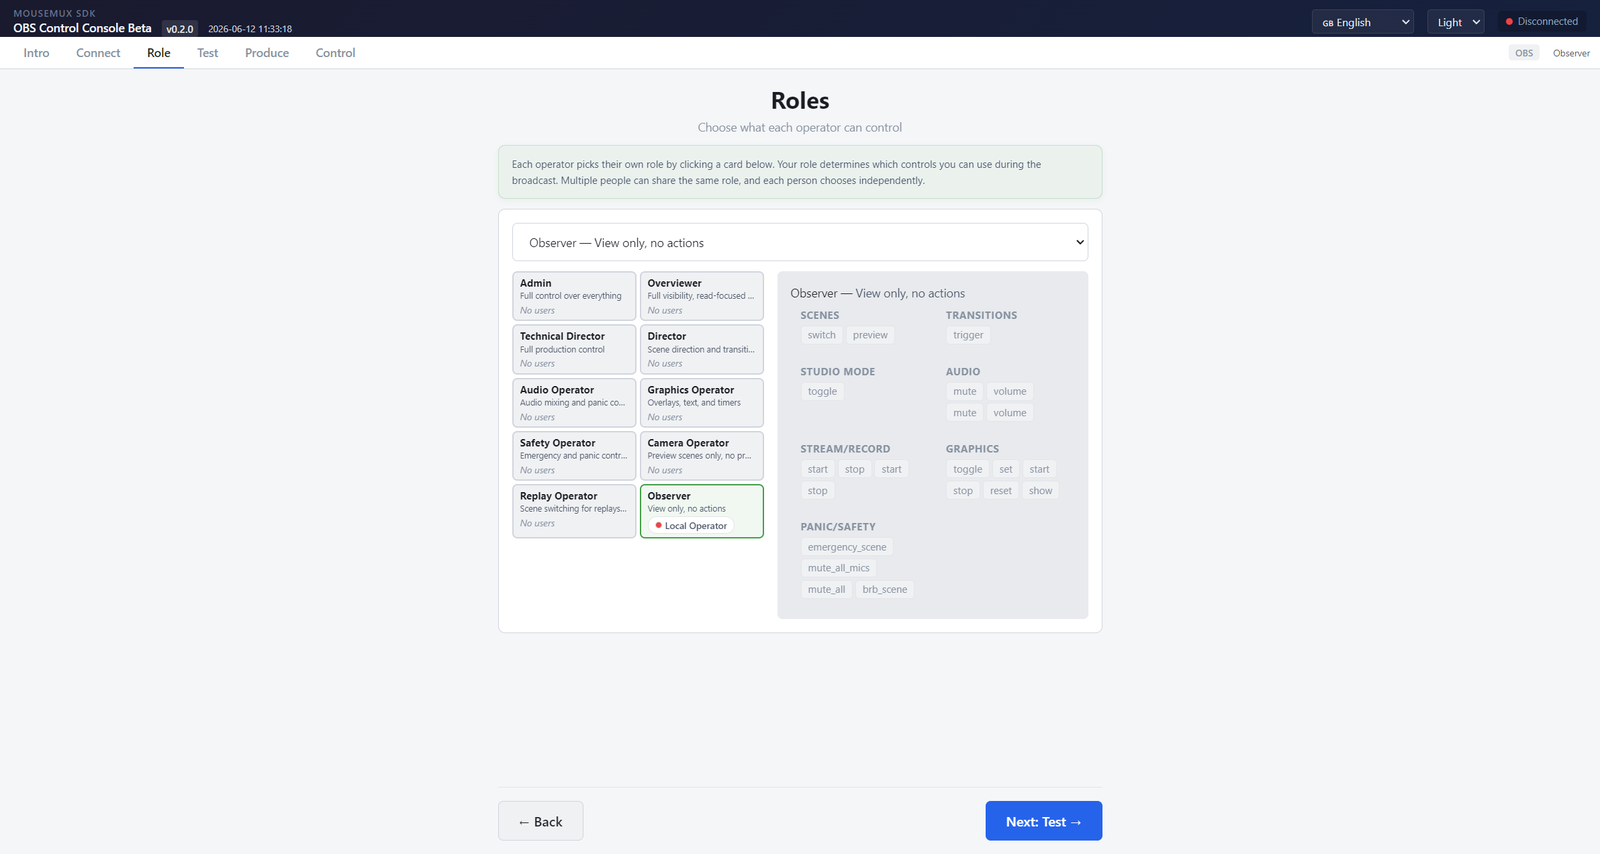
OBS Control Console
Run a live OBS Studio production as a team. Manage scenes, sources, audio and recording from one shared console, and assign roles like Director and Operator so each person owns their part of the broadcast. Ideal for live streams, events and studio setups where one operator simply is not enough.
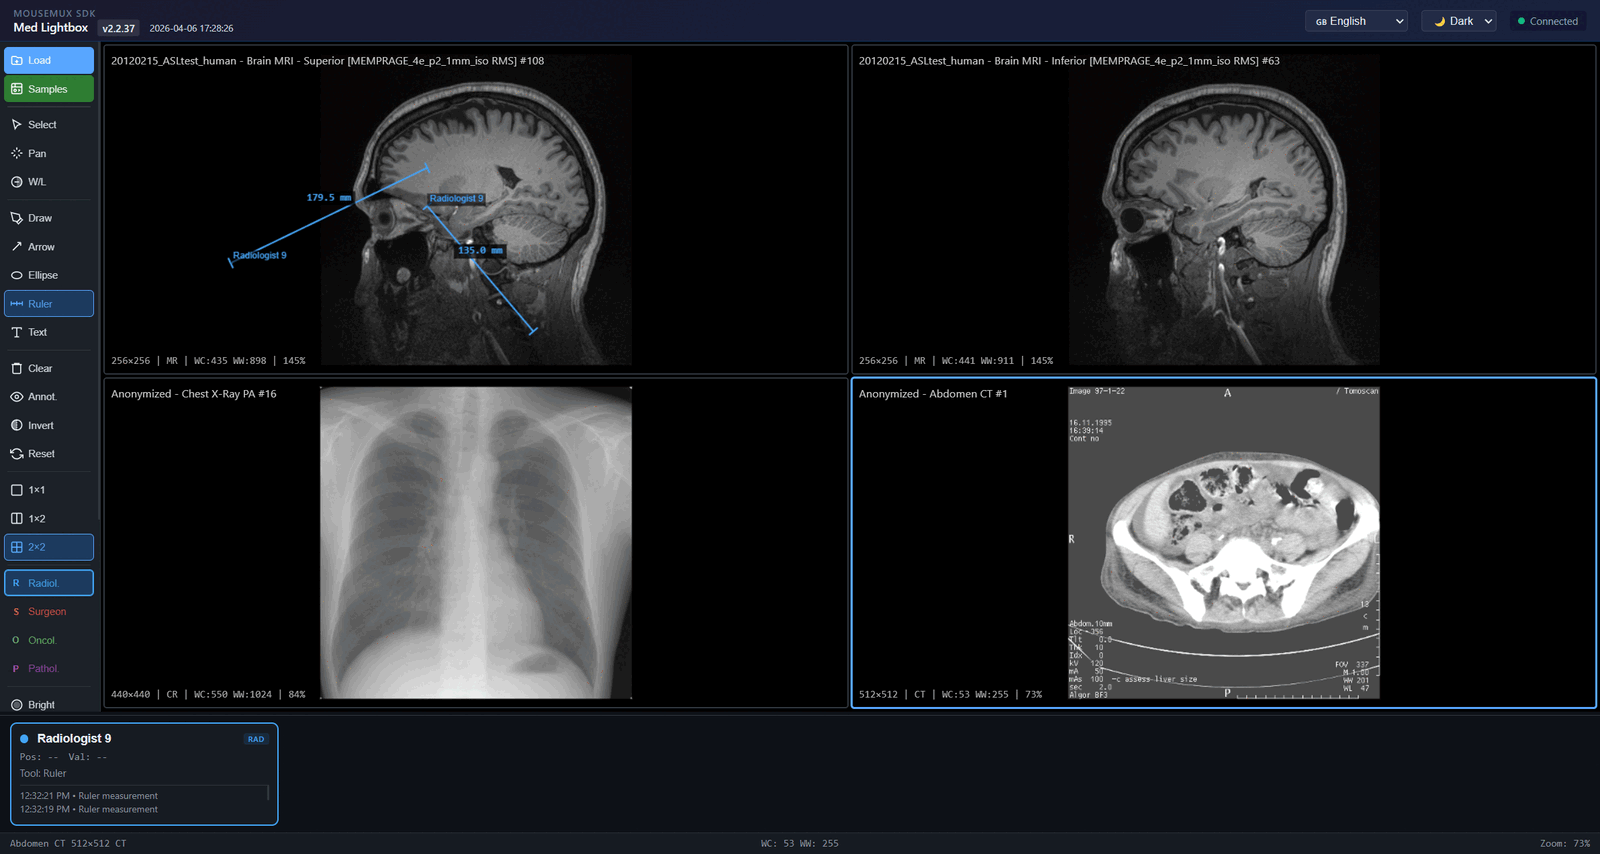
Med Lightbox
A multi-user medical lightbox. Several clinicians view, annotate and measure the same DICOM scans (X-ray, CT, MRI) side by side, each with their own mouse. Built for radiology reviews, tumor boards and teaching, where doctors need to point, draw and measure on one scan together rather than taking turns.
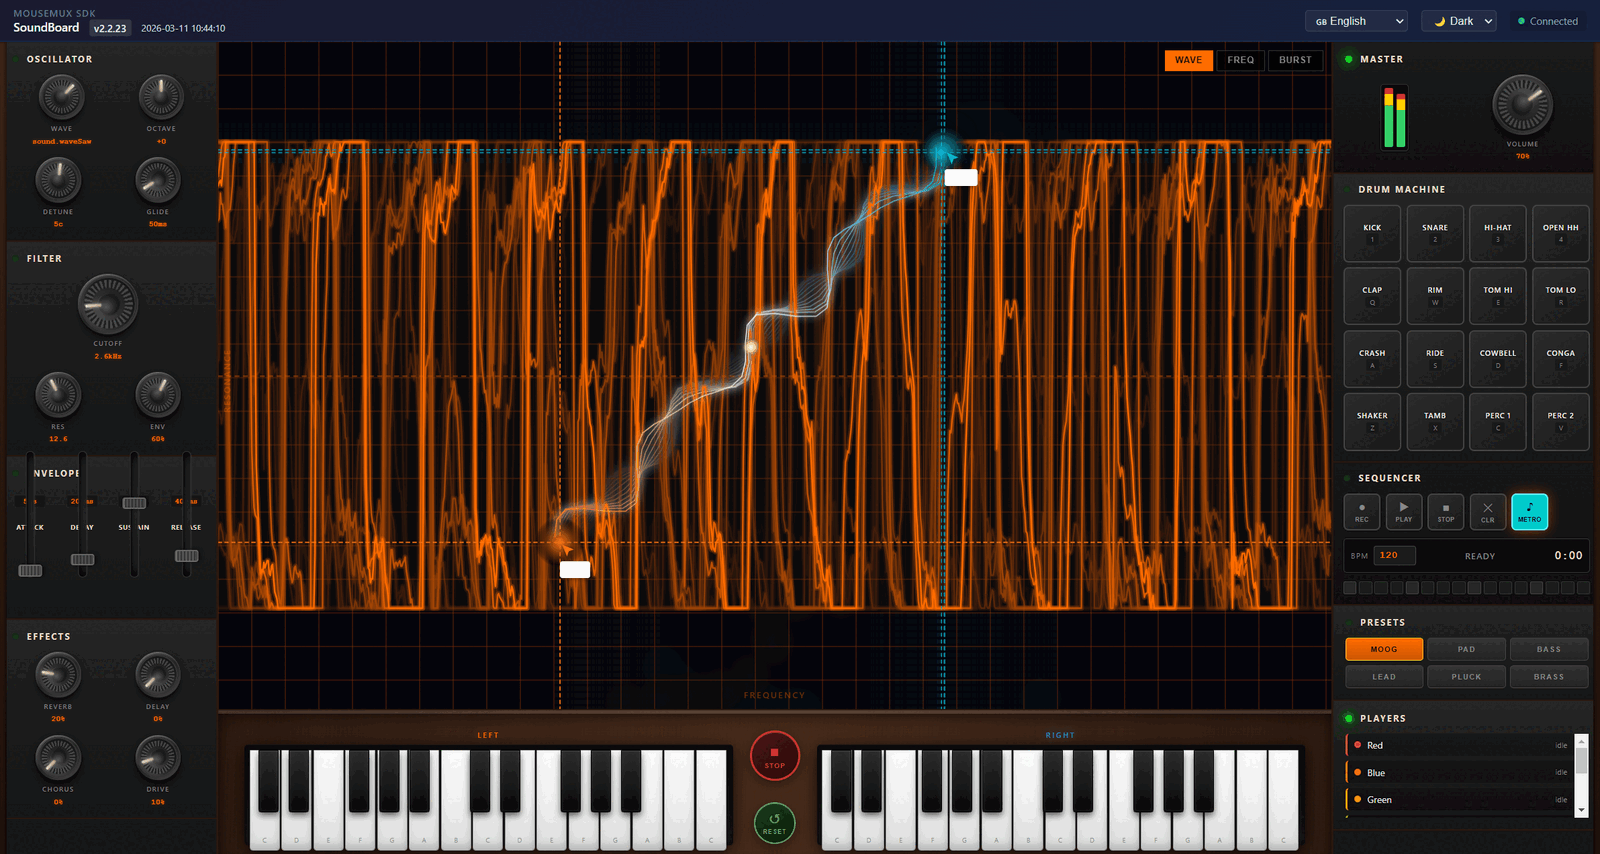
SoundBoard
Make music together on Moog-inspired synthesizers, drum machines and keyboards. Each person plays and shapes the sound directly while live visuals react in real time. Perfect for jam sessions, music classes and hands-on interactive installations.
Multi-seat browsers
The opposite scenario is isolation: an app, or even a single window, is locked to one user and stays completely private to them.
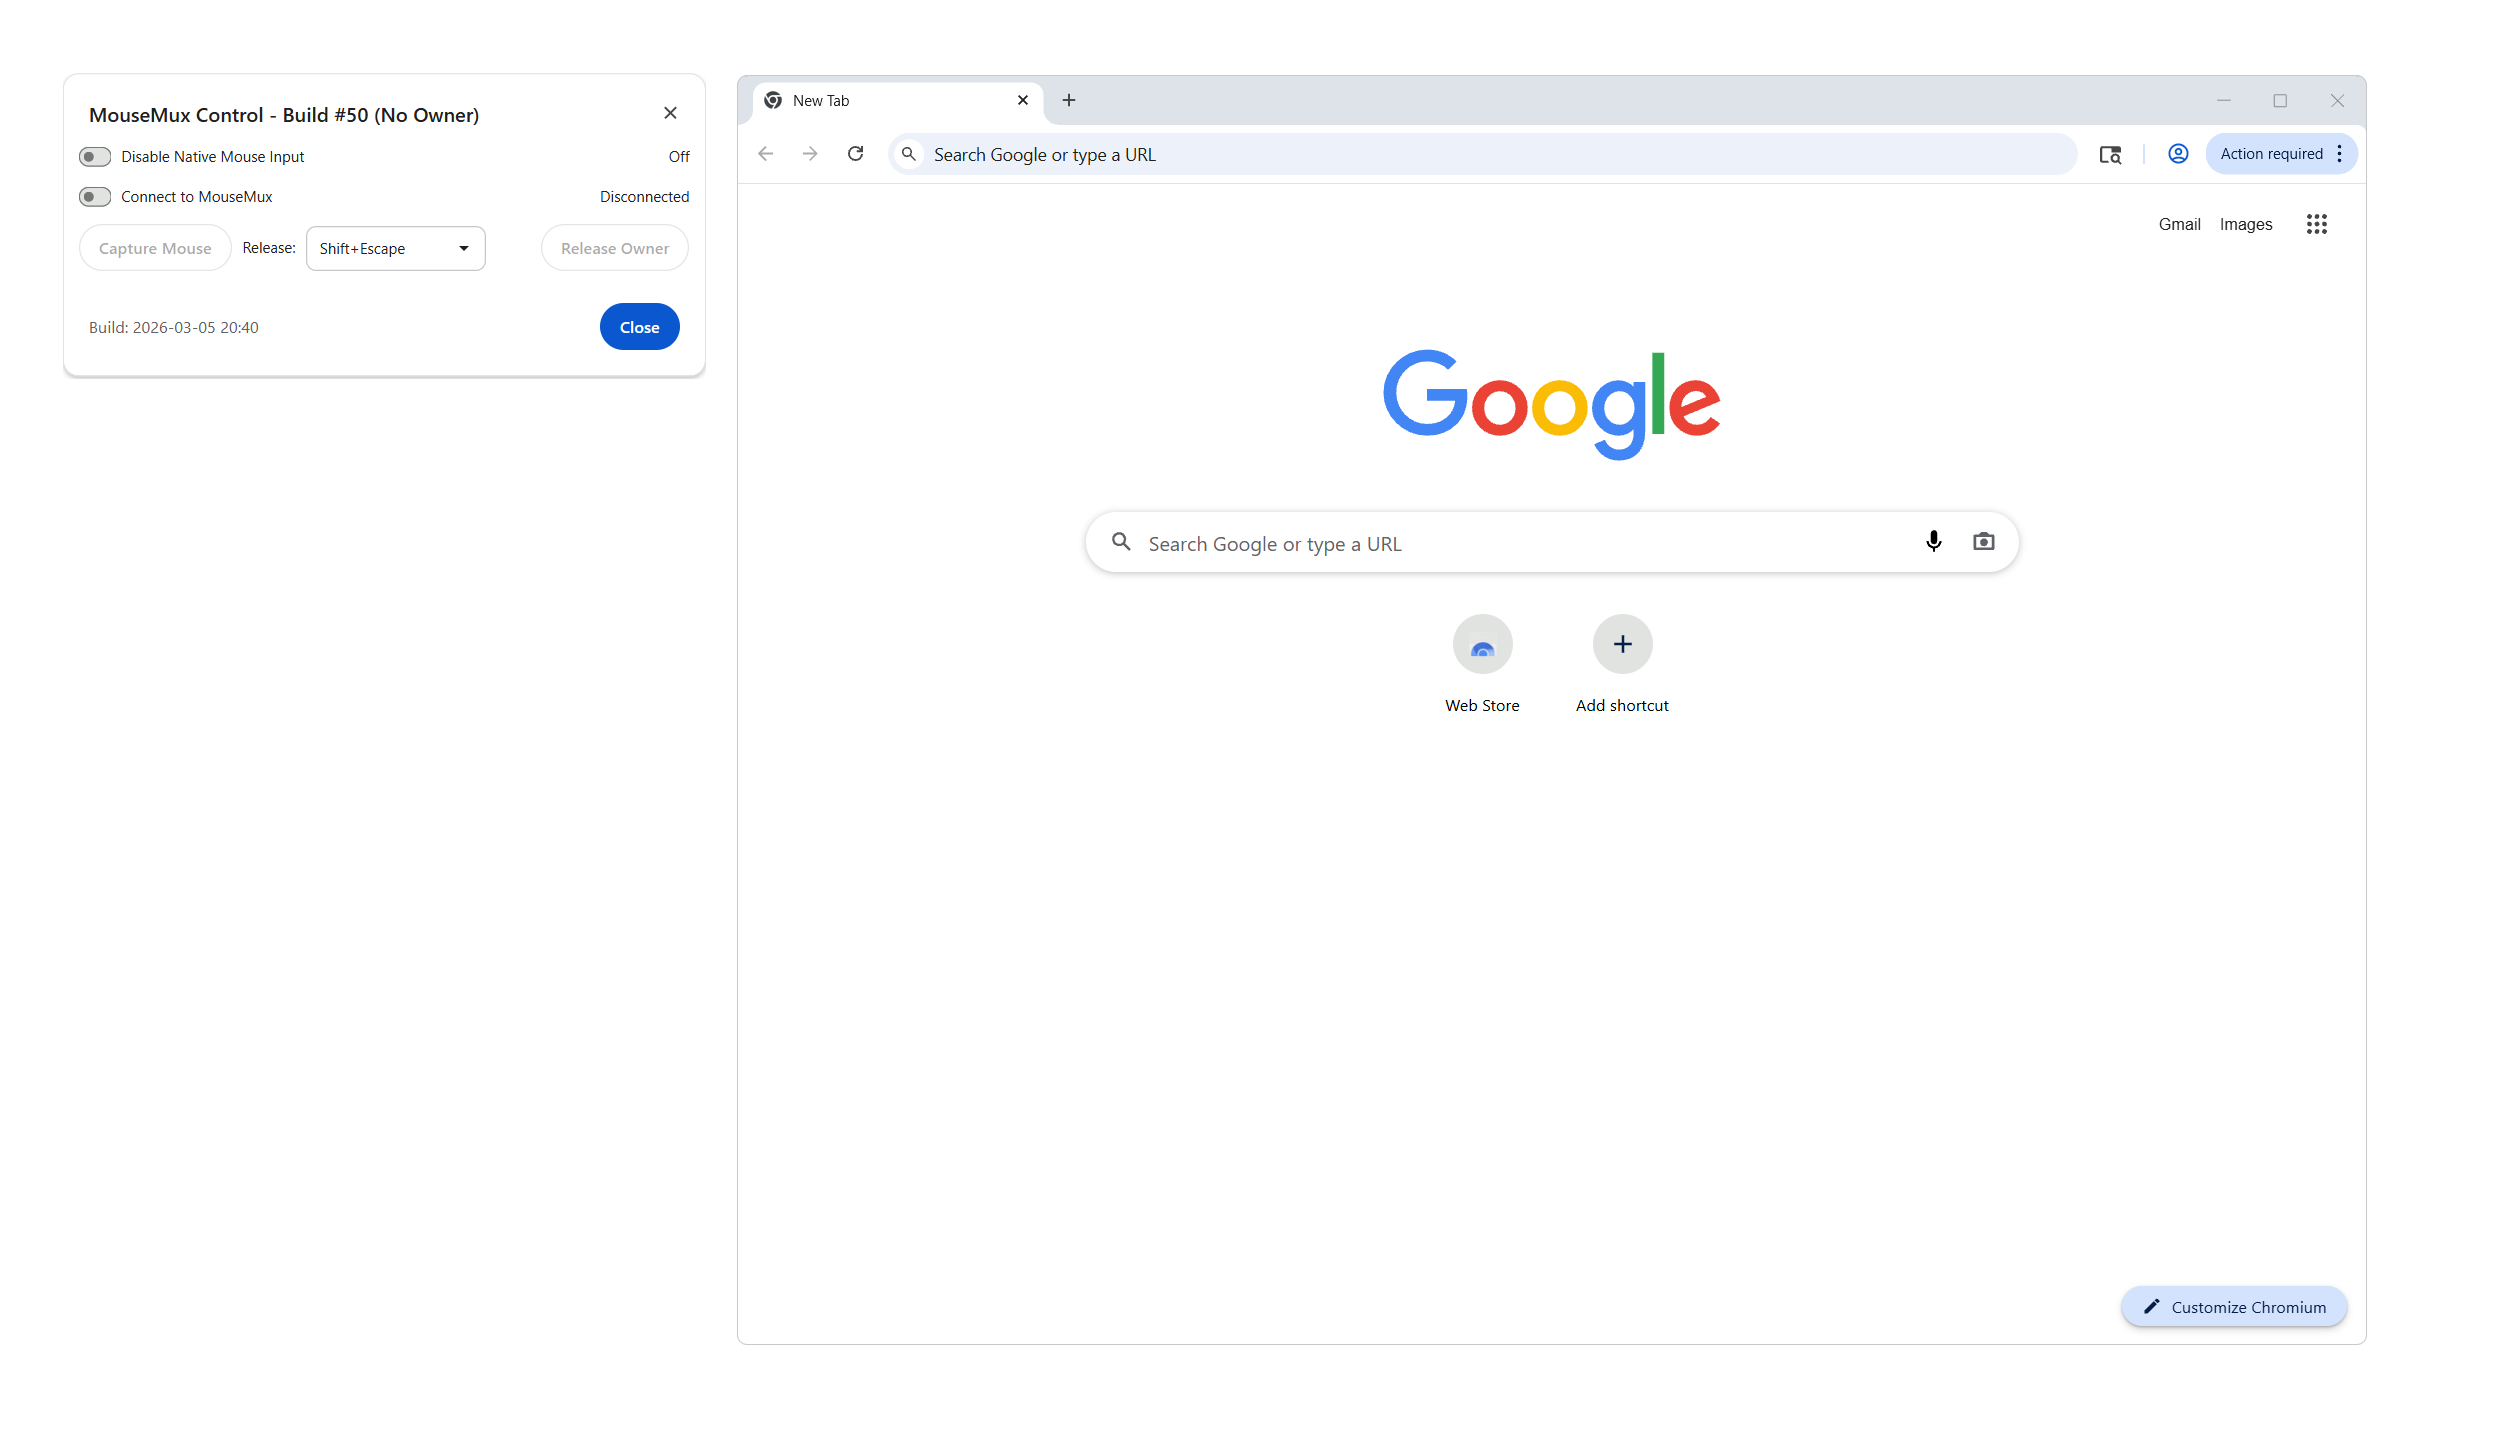
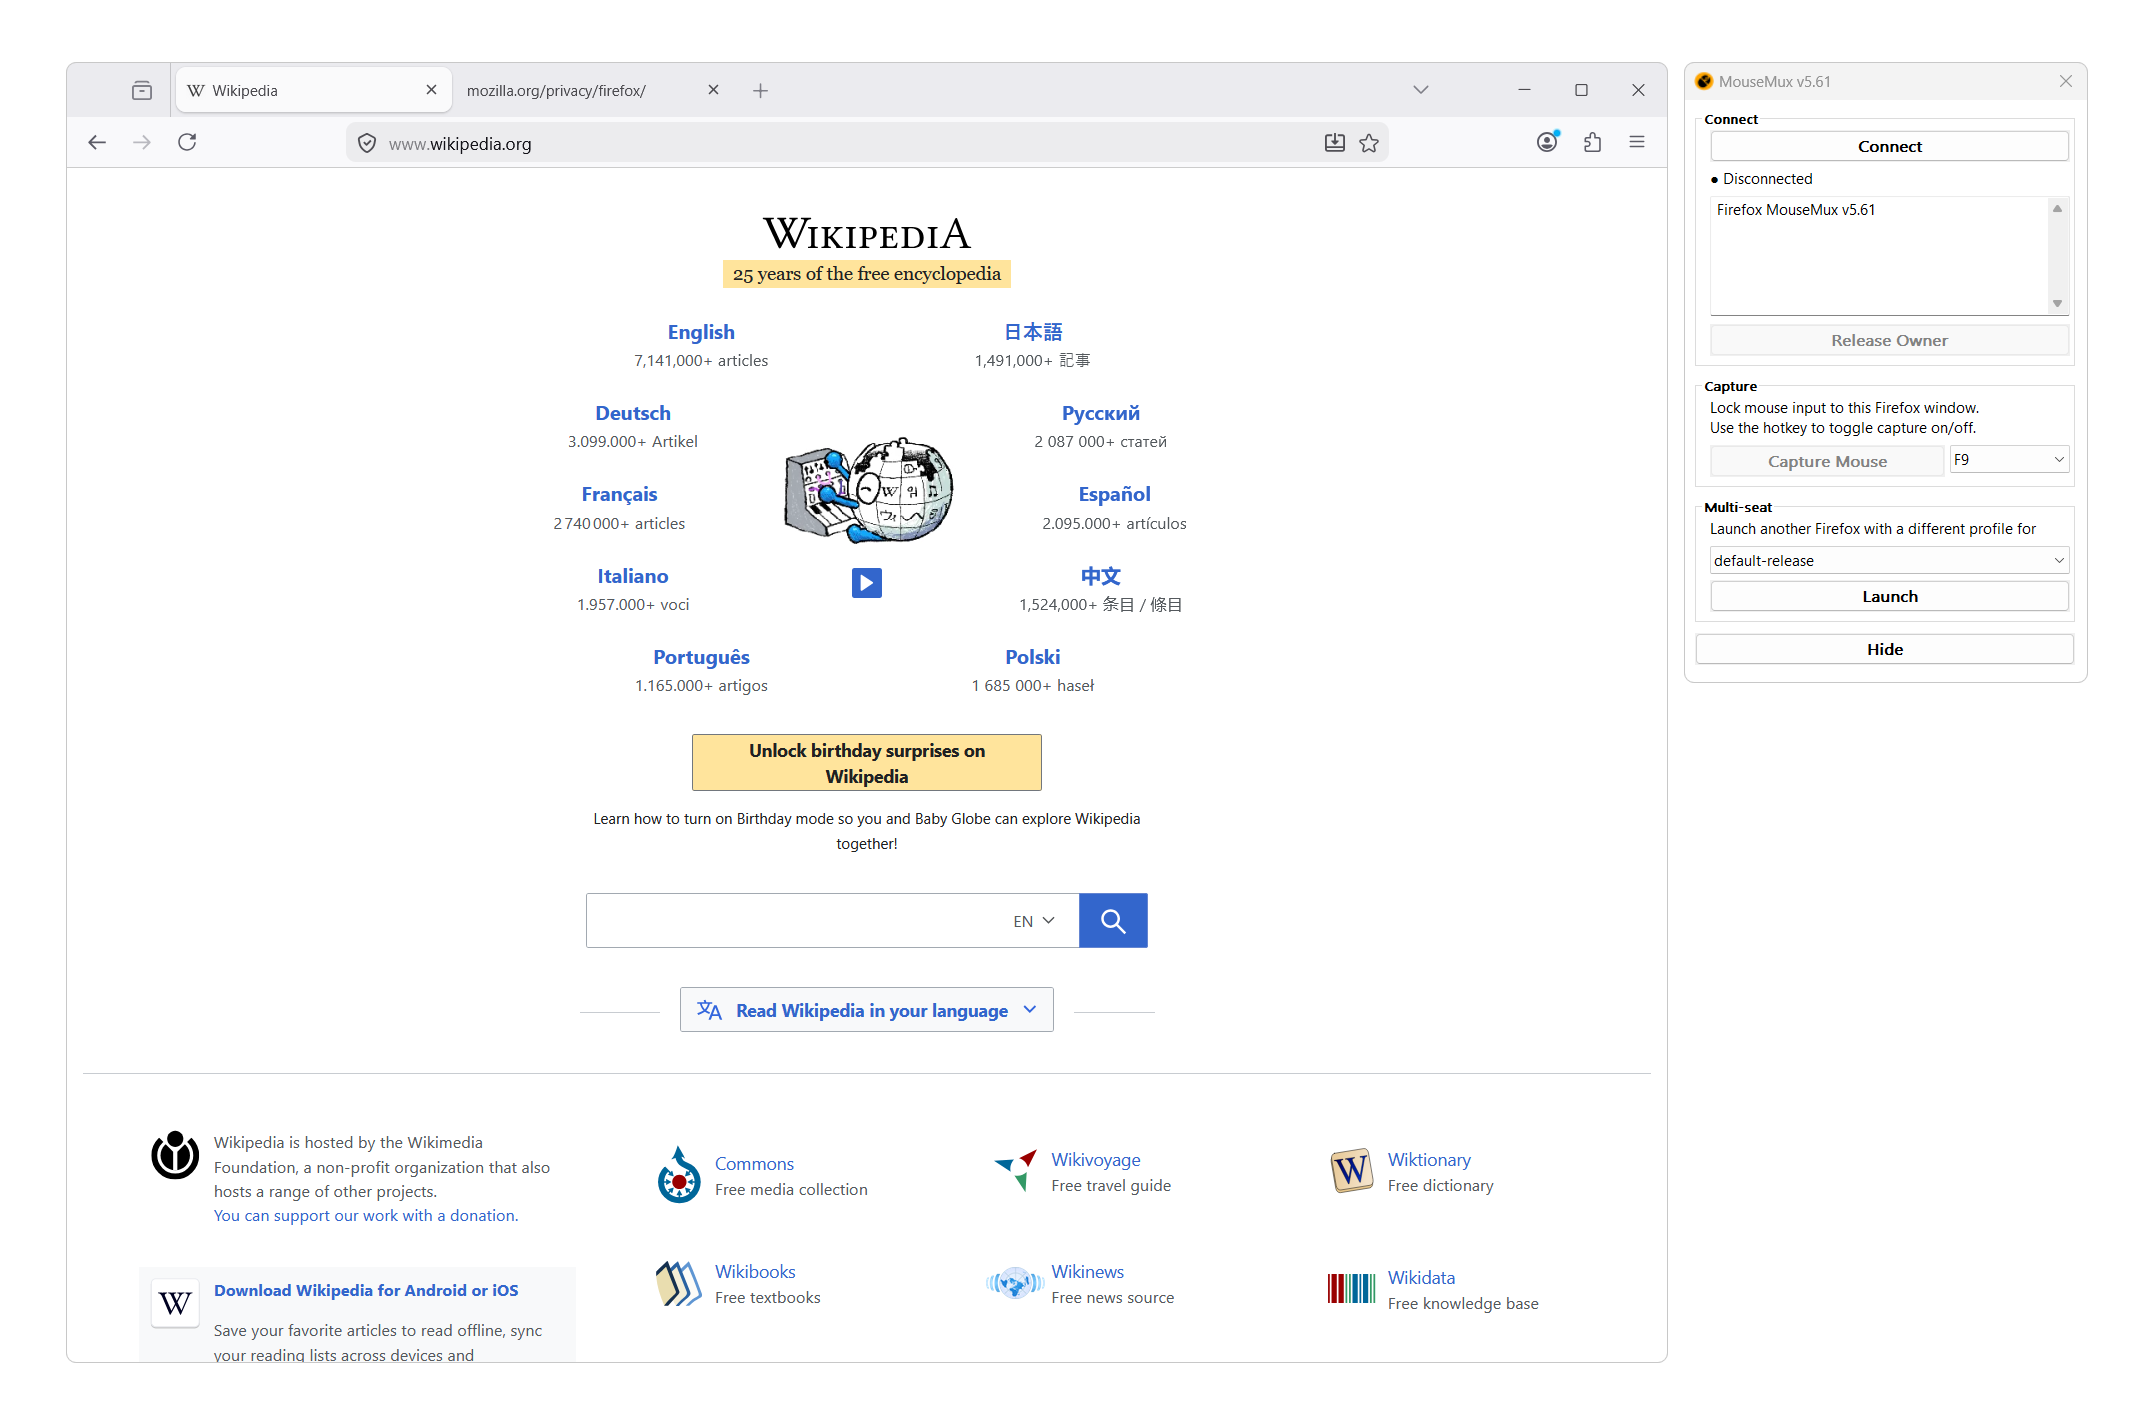

Chrome and Firefox are the real, native browsers, customized by the MouseMux team to work as a seat. Each browser is isolated from normal Windows input: it does not listen to the desktop at all. Instead it listens only to the one MouseMux user you lock to it. You can take it a step further and block that user's input from reaching the rest of the OS, so that user can only ever interact with their browser and nothing else; private and very safe, ideal for kiosks and locked-down stations.
It also lets remote users work in their own browser running on your PC. Because the browser belongs to a single user and runs from your machine, a remote person can reach a site that is locked to your IP address or location: while you and others carry on using the same computer in your own browsers, completely independently.
Run several at once and the desktop becomes multi-seat: two or more people each drive their own isolated browser side by side, with their own windows, tabs, logins and cursor, and neither able to disturb the other.
Configuration
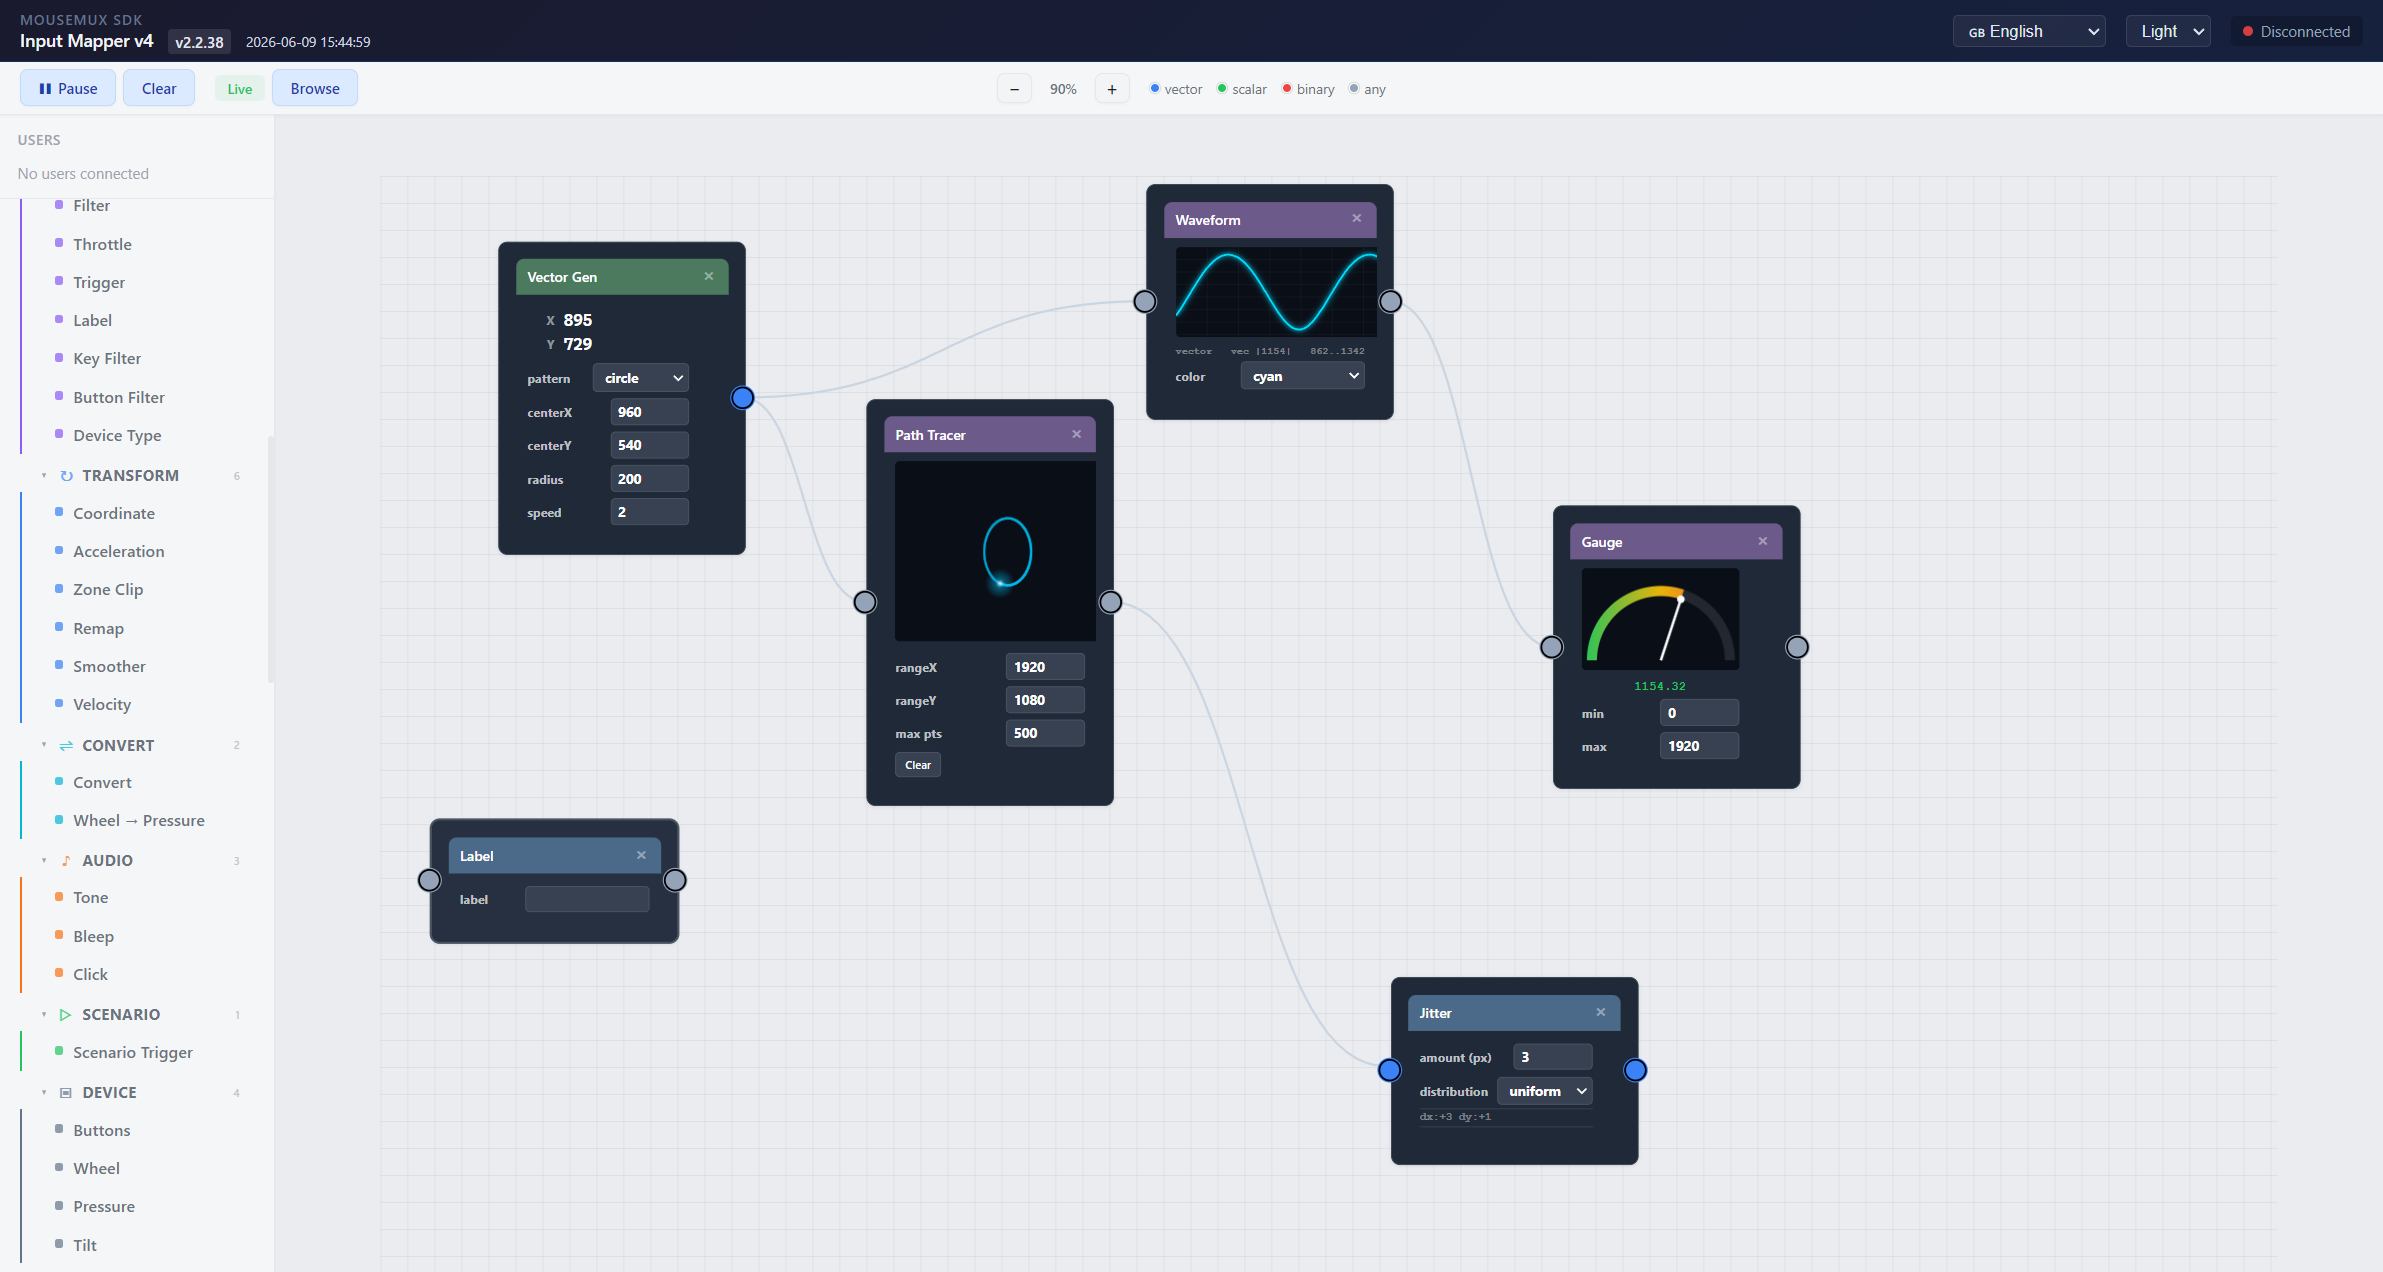
A third kind are configuration apps: tools that shape how MouseMux behaves and how input flows, rather than something you collaborate in. The centerpiece is the Input Mapper: a visual, drag-and-drop node editor for MouseMux input.
Route mouse and keyboard signals through 90+ nodes: math, filters, gates, macros, audio feedback, screen analysis, network bridges and live visualizers. Record and play back input, create virtual users, build multi-step automations, speak custom protocols, and even bridge input over the internet with TCP and UDP.
It also speaks the Barrier protocol, so it works directly with software KVMs. A software KVM lets one keyboard and mouse control several computers over the network: you glide your cursor off the edge of one machine's screen straight onto the next, as if they were extra monitors, with no extra hardware. MouseMux interoperates with the popular ones: Barrier, Synergy, Input Leap and Deskflow.
If you can picture a flow, you can wire it together visually; it is a totally flexible tool for building almost anything you want on top of MouseMux input.
App Launcher
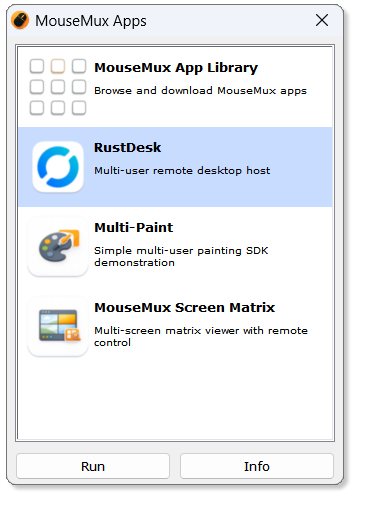
Press Apps in the main window to open the App Launcher: quick access to the applications installed on this machine that have been tested and customized for multi-cursor use. Select an app and press Run to launch it, or Info to read what it does. The top entry opens the App Library where you can browse and download more apps.
App Info
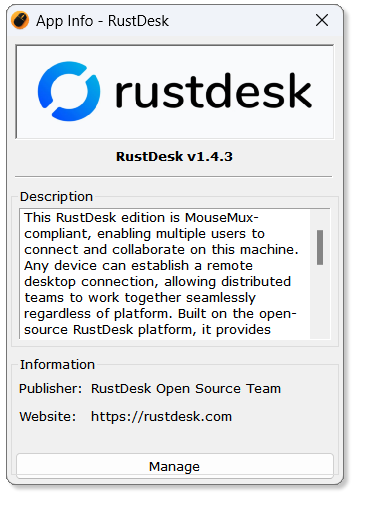
Press Info to see the app's logo, version, full description, publisher and website. From here, press Manage to maintain the app.
Manage
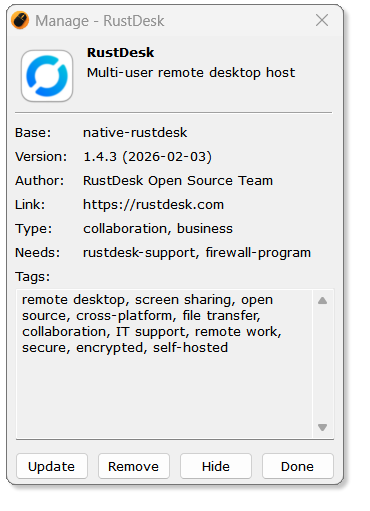
The Manage dialog shows the technical details of an installed app: base package, version and release date, author, link, type, requirements (Needs) and tags.
Update: update the app to the latest version. Remove: uninstall the app from the launcher. Hide: keep the app installed but hide it from the list. Press Done when finished.
App Library
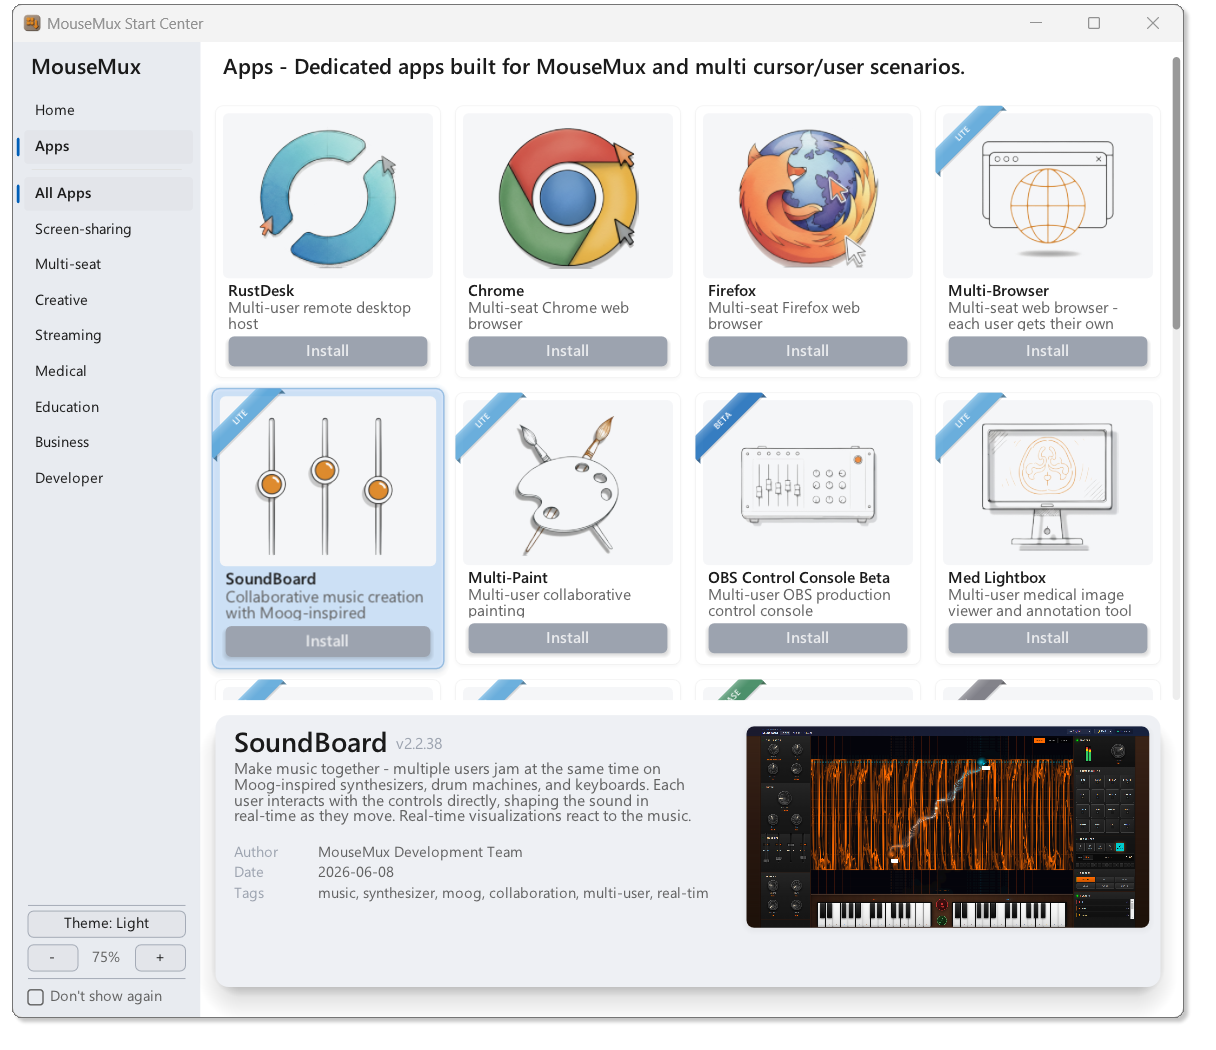
The App Library is where you browse and download new apps. Open it from the top entry in the App Launcher, or switch to the Apps tab in the Start Center. Downloaded apps appear in the App Launcher, ready to run.
How it works
The sidebar on the left has the Home and Apps views plus a category list: All Apps, Screen-sharing, Painting, Creative, Streaming, Medical, Education, Business and Developer. Pick a category to filter the grid.
Every app is shown as a card with its icon and a short description. Hover or select a card and the info pane at the bottom fills with the details: version, full description, author, release date, tags and an animated screenshot preview. Press Install on a card to download the app; once installed it appears in the App Launcher.
Keyboard shortcuts
| Key | Action |
|---|---|
| Arrow keys | Move between apps in the grid, or up and down the sidebar |
| Tab | Switch focus between the sidebar and the app grid |
| Enter / Space | Open the focused item or install the focused app |
| Mouse wheel | Scroll the app grid |
Zoom & theme
At the bottom of the sidebar you find the display controls:
- Theme: switch the entire library between Light and Dark.
- - / +: zoom the whole window in 10% steps; the current scale is shown between the buttons (e.g. 75%).
- You can also simply resize the window: the interface scales along with it and briefly shows the new percentage while you drag.
- Don't show again: skip opening the Start Center on future launches.
The zoom level and theme are remembered between sessions.
The App Library does not need a GPU: on machines without working graphics acceleration (virtual machines, remote desktop sessions, old or blocked drivers), it automatically falls back to software rendering and keeps working.
The App Launcher can be disabled in Advanced Settings under Features.
Capture Device
The capture device is a special virtual input that catches mouse and keyboard events injected into Windows by software or certain hardware, and turns them into their own independent MouseMux user with their own cursor. You enable it whenever input is reaching Windows without coming from a normal, plugged-in pointer.
To enable it: open Advanced Settings, go to Input > Capture and switch on the capture device. A new red capture user appears in the main window device list, ready to be configured like any other user.
You need the capture device for these common cases:
- Remote desktop users connecting through TeamViewer, AnyDesk or Chrome Remote Desktop (see Remote Desktop)
- Auto-clickers and macro programs that inject mouse or keyboard events
Laptop touchpads no longer need the capture device: high-precision touchpads now have their own dedicated touchpad device, available in every edition.
Auto-clickers & Macro Programs
Programs that inject mouse/keyboard events (auto-clickers, macro recorders) are captured by the capture device and routed to the red user. Follow the same steps as Remote Desktop below.
Remote Desktop
MouseMux gives remote users their own independent cursor on your screen, so a local and a remote user can work side by side instead of fighting over a single pointer.
RustDesk works natively. With the built-in RustDesk integration, a remote user connects and instantly gets their own MouseMux cursor on your desktop; no capture device needed. Install RustDesk from the App Library and connect as usual. The bundled RustDesk also supports remote printing: remote users can print documents from your machine straight to their own local printer.
TeamViewer, AnyDesk and Chrome Remote Desktop work through the capture device, which catches the injected remote input and turns it into its own MouseMux user:
- Enable the capture device in Advanced Settings under Input > Capture.
- Go to the red user's Input tab and uncheck Disable this device. Do the same in the Keyboard tab.
- If you get double clicks, open Service Configuration (Advanced Settings > Maintenance) and enable Block (external) injection.
- For independent typing, enable the capture keyboard in the red user's Keyboard tab and check Multi keyboard in the main window.
Multiple Monitors & DPI
All monitors together form one large desktop, and every cursor moves freely across all of them; there is nothing to configure. MouseMux is per-monitor DPI aware, so monitors with different scale percentages (say 100% next to 150%) are handled automatically too.
For the special cases:
- Confining a user to one monitor, a custom region or a single window: use the Lock tab.
- Tablets and touchscreens that cannot reach a monitor left of, or above, the primary one: enable Force screen offset on the Output tab.
- If the MouseMux windows render oddly on a mixed-DPI setup: enable Disable dynamic DPI in Advanced Settings under Features > Output. It switches to fixed scaling, which can look slightly blurry on high-DPI displays but maximizes compatibility.
Laptop Trackpads & Touchpads
Most laptop trackpads are "high precision" touchpads: instead of reporting as a normal mouse, they inject their movement directly into the Windows input subsystem. When MouseMux is active that injected input is not tied to a physical device, so the touchpad can appear to stop working.
MouseMux has a dedicated touchpad device for exactly this, and it is available in every edition, including Free. It shows up as its own row in the main window device list, ready to catch your touchpad's input and give it its own independent cursor.
To enable it: open the touchpad device's Input tab (double-click its row in the main window) and uncheck Disable this device. The change takes effect immediately, no restart needed, and your touchpad works as normal again, as a fully independent user you can configure like any other pointer.
Two related options live in Advanced Settings under Features > Touchpad:
- Touchpad on startup: automatically activate the touchpad device every time MouseMux starts.
- Touchpad device: remove the touchpad device entirely if you never use it.
Troubleshooting
Most problems have a one-click fix somewhere in this manual. Find your symptom below and follow the link.
| Symptom | Fix |
|---|---|
| Something feels stuck, input behaves strangely | Press CTRL-ALT-F12 to force-quit MouseMux instantly, then start it again |
| A program ignores drags or drawn strokes (drawing apps, games, CAD) | Enable Force hardware dragging or Force hardware motion on the Output tab |
| Typing lands in the wrong window, or nowhere (Multiplex / Multi keyboard) | Try the focus options on the Keyboard tab |
| AltGr characters (@, €) do not type | Enable Force ALT-GR via right ALT on the Keyboard tab |
| Double clicks when using auto-clickers or remote desktop | Enable Block (external) injection in Service Configuration (see Auto-clickers) |
| A program keeps warping or recentering the cursor | Enable Enable delta motion on the Output tab |
| A keyboard is mapped to the wrong user | Press Unmap on that user's Keyboard tab, then press a key on the keyboard you want to map |
| A device does not appear in the user list | Move it once (new devices appear on first movement); also check Hide inactive devices and the device's Disable this device setting |
| My laptop trackpad stopped working | Enable the dedicated touchpad device |
Still stuck? Mail [email protected] with your MouseMux version (shown in the info box under Settings), your Windows version and a short description of your setup. We read everything.